- Part 1. Can You Burn Netflix Videos to DVD?
- Part 2. How to Download Netflix Videos to MP4 on Windows or Mac

- Part 3. How to Convert Netflix Videos to DVD-Compatible Format (Optional)
- Part 4. How to Burn Netflix Videos to DVD on Windows
- Part 5. How to Burn Netflix Videos to DVD on Mac
- Part 6. How to Play Netflix Videos on a DVD Player
- Part 7. Troubleshooting Netflix DVD Problems

There is something a little old school about burning a DVD. Still, turning a favorite show into a disc you can hold feels satisfying. You can bring it to your grandma's house, play it on an older TV, or keep it on the shelf for later.
If you already subscribe to Netflix, it feels like the natural place to start. Your favorite movies and shows are right there. It sounds simple. Download the Netflix video and burn it to a disc.
But can you actually burn Netflix videos to DVD like regular MP4 files?
The official Netflix offline download feature does not create a format that works with normal DVD burning software. However, with a dedicated downloader that saves Netflix videos as MP4 files, the process becomes possible.
In this post, we will show how to use ViWizard Netflix Video Downloader to download Netflix videos to MP4 and then burn them to a DVD with authoring software. Let's get started.
- Step 1. Get a Downloader: Install a tool like ViWizard Netflix Video Downloader on your Windows or Mac.
- Step 2. Download as MP4: Log in to your Netflix account and save the movie or show as an MP4 file.
- Step 3. Convert for DVD: Change the MP4 video to MPEG-2 format for DVD player support.
- Step 4. Insert a Blank Disc: Place a writable DVD into your computer's DVD drive.
- Step 5. Burn the DVD: Use DVD authoring software to create a playable disc.
Part 1. Can You Burn Netflix Videos to DVD?
Not directly. Netflix uses DRM protection to prevent unauthorized use, so streamed or downloaded titles are not standard video files. This means you are limited to online streaming, ongoing subscription fees, or losing access to your favorite movies without a reliable backup like a DVD for long term storage.
If you really want to create DVD copies from Netflix, using a tool like ViWizard Netflix Video Downloader to download Netflix videos to MP4 may be the most practical solution. This is also the common answer you will see on many forums. ViWizard Netflix Video Downloader gives you more flexibility by downloading and converting Netflix movies so they can work around certain DRM limits.

A state-of-the-art Netflix downloader gives you the ability to download and convert a wide variety of movies, TV shows, anime, documentaries, awarding-wining original, and more from Netflix to MP4 and MKV with Dolby Atmos 5.1 surround sound and multilingual subtitles for watching anywhere.
After that, you can insert a blank disc and use DVD authoring software such as DVD Flick on Windows or Burn on Mac, or even built in system tools. For a disc that works on most DVD players, you will need to convert the MP4 files to MPEG-2 format before burning.
Part 2. How to Download Netflix Videos to MP4 on Windows or Mac
So, you have decided to burn Netflix movies or TV shows to a DVD. Great. Before talking about DVD authoring tools, the first step is downloading the videos in a format that works.
ViWizard Netflix Video Downloader lets you save movies, TV shows, documentaries, and anime from Netflix in formats like MP4 or MKV, with support for up to 1080p quality. This makes it much easier to prepare videos for DVD burning. It also supports 5.1 audio, so you can enjoy better sound on your home system.
Try ViWizard Netflix Video Downloader on Windows or Mac to download Netflix content for personal use and get it ready for DVD creation without streaming limits.
Key Features of ViWizard Netflix Video Downloader
Free Trial Free Trial* Security verified. 5, 481,347 people have downloaded it.
- Download Netflix movies, TV shows and more locally
- Convert Netflix movies and TV shows to MP4 or MKV
- Save multilingual language and subtitles in two types
- Remove ads from Netflix and keep original video quality
Step 1Access Netflix Content through ViWizard

First, open the ViWizard Netflix Video Downloader on your laptop. You'll be directed to the integrated Netflix Web Player. Sign in with your Netflix account credentials to gain access to Netflix's entire library, including movies, TV shows, documentaries, and anime.
Step 2Customize Download Settings

Next, click the hamburger icon (three horizontal lines) in the top right corner of the ViWizard interface. Choose "Settings" from the dropdown menu, and head to the "Download" section. Here, you can adjust your settings to match your preferences. Set the video format, codec, quality, audio channel, language, and subtitle options according to your needs. Click "OK" to apply these settings.
Step 3Select Content for Download

Once your settings are configured, return to the ViWizard Web Player. Use the search bar to find specific content by entering the name, keyword, or code. Alternatively, you can paste the URL or code of the Netflix movie or TV show you want to download. Open the content you've chosen to proceed.
Step 4Initiate Download Process

With your content selected, click the "Download" button to start the download. If you want to download it later, you can click "Add to List" to queue it. ViWizard will handle the download of individual episodes, entire seasons, or full-length movies, depending on your selection. The downloads will be saved as MP4 or MKV files in your laptop's default download folder. Just wait until the process is complete.
Step 5Access Downloaded Content

To find your downloaded Netflix content, go to the "Converted" section at the top of the ViWizard interface. Here, you'll see a list of all your completed downloads. Click the "Folder" icon next to each title to locate and access the files on your laptop.
Part 3. How to Convert Netflix Videos to DVD Compatible Format (Optional)
MP4 works well on computers, but it is not always suitable for a home DVD player. While some modern players are more flexible, most standard DVD players still require MPEG-2 within a proper DVD structure. In that case, you may need to convert the MP4 file to a DVD-compatible format such as MPEG-2 before burning.
1. Using HandBrake (Windows/Mac)
Step 1 Open HandBrake on your computer.
Step 2 Click Open Source at the top-left and select your downloaded Netflix video file.
Step 3 On the right under Preset, pick Fast 480p30 or another DVD-friendly profile.
Step 4 Go to the Summary tab and set Format to MP4.
Step 5 Switch to the Video tab and choose Codec: MPEG-2 if it is available. If not, leaving it as H.264 works for standard DVDs.
Step 6 Click Browse under Destination, pick a folder, and give the file a name.
Step 7 Click Start Encode at the top and wait for the conversion to finish.
2. Using VLC Media Player (Windows/Mac)
Step 1 Open VLC Media Player.
Step 2 Go to Media > Convert / Save.
Step 3 Click Add and select your Netflix video file.
Step 4 Click Convert / Save at the bottom.

Step 5 In Disc, select Video – MPEG-2 + MPGA (DVD).
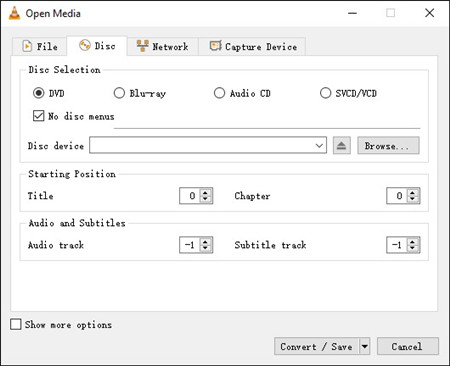
Step 6 Click Browse to choose a folder and name for the converted file.
Step 7 Click Start and wait for VLC to finish converting.
Part 4. How to Burn Netflix Videos to DVD on Windows
After conversion, Windows offers several DVD authoring tools, from basic free options to more advanced programs with menus and chapters. You can choose the one that fits your needs and follow the guided steps to create your disc.
1. Using DVD Styler
A free, open-source program for turning video files into DVDs with menus, chapters, and buttons. It supports multiple audio tracks and subtitles. The interface is a bit old, and very large projects may slow it down, but it works well for most downloads.
- Open DVD Styler on your Windows computer.
- Click File > New and set Video Format (NTSC/PAL) and Disc label.
- Click + Add File or drag your video into the Titleset area.
- Arrange videos and click Menu to pick a menu template if needed.
- Click the Burn button on the toolbar.
- Choose Burn to disc, insert a blank DVD, and click Start.
- Wait for the burn process to complete and eject the DVD.
2. Using WinX DVD Author
Handles almost any video format, including MP4, AVI, MKV, and MOV. You can trim videos, add subtitles, and choose PAL or NTSC. Drag-and-drop makes creating DVDs with menus simple.
- Open WinX DVD Author.
- Click Video DVD Author from the home screen.
- Click + Add File and select your video files.
- Set Aspect Ratio and select NTSC or PAL.
- Click Start in the bottom corner.
- Insert a blank DVD when prompted.
- Wait for the burning to finish and close the app.
3. Using Roxio Creator NXT
A full media suite for editing videos, creating slideshows, designing disc labels, and burning DVDs. It costs money and takes some learning, but it offers polished menus and all-in-one functionality.
- Open Roxio Creator NXT.
- Click MyDVD on the main dashboard.
- Drag your Netflix video files into the project area.
- Click Menu and choose a menu template.
- Click Burn at the top of the window.
- Confirm Disc Speed and TV Standard, then click Burn.
- Wait for the DVD to finish burning and eject the disc.
4. Using Nero Video
Combines video editing and DVD burning. Trim clips, add transitions, and create chapters and menus. Works with HD videos for smooth playback on standard players.
- Open Nero Start and launch Nero Video.
- Click DVD (or Video DVD) as the project type.
- Click Import and add your Netflix video files to the Timeline/Storyboard.
- Click the Menu tab and choose a DVD menu style.
- Click the Burn button (disc icon).
- Choose Burn to disc and confirm TV Standard.
- Click Burn and wait for completion.
Part 5. How to Burn Netflix Videos to DVD on Mac
On Mac, the workflow is similar. Add your converted video, choose simple menu options if needed, and burn it to a blank disc.
1. Using Burn
A simple, free DVD program. Drag in videos, set options, and burn. No fancy menus, but easy to use.
- Open the Burn app on your Mac.
- Click the Video tab.
- Click the + button and select your Netflix video file.
- Choose DVD‑Video from the Format dropdown.
- Insert a blank DVD into your drive.
- Click Burn at the bottom right.
- Wait for the project to burn and eject the disc.
2. Using iDVD
Apple's older DVD tool. Drag clips, pick themes, and create slideshows. Not updated anymore, but still works on older Macs.
- Open iDVD (if installed) on your Mac.
- Click Create a New Project.
- Drag your video file into the bottom movie area.
- Click Themes and pick a DVD menu theme.
- Insert a blank DVD when prompted.
- Click the Burn button in the toolbar.
- Wait for iDVD to encode and burn the DVD.
3. Using Roxio Toast Titanium
A complete Mac DVD tool. Burn discs, convert files, capture screens, and create custom menus. Drag-and-drop makes it simple to assemble DVDs.
- Open Roxio Toast Titanium.
- Click the Video tab.
- Drag your Netflix video into the main Toast window.
- Click Menu and pick a DVD menu style (optional).
- Insert a blank DVD into your drive.
- Click the Burn button at the bottom right.
- Wait for the burn to complete and eject the DVD.
4. Using DVD Creator by Wondershare
A paid, cross-platform DVD burner. Add videos in almost any format, make minor edits, and build menus from templates. Simple and reliable for Netflix downloads or home videos.
- Open Wondershare DVD Creator on your Mac.
- Click Create a DVD Video Disc.
- Click + or Add Files to import your Netflix videos.
- Click the Menu tab and choose a DVD menu template.
- Click Preview to check the DVD layout.
- Insert a blank DVD and click Burn to Disc.
- Click Burn and wait for the process to finish.
Part 6. How to Play Netflix Videos on a DVD Player
Once your disc is burned, the final step is simple.
1. Using a Standalone DVD Player
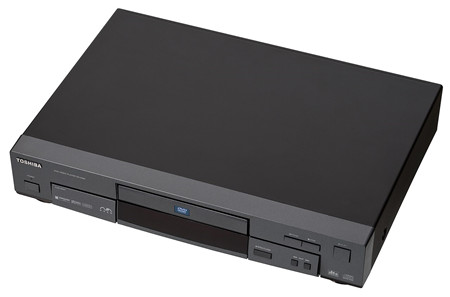
Step 1 Turn on your TV and DVD player, and set the TV input to the correct source. Press Open/Close on the player or remote to eject the tray.
Step 2 Place your burned DVD with the label side up and press Close. Wait for the player to read the disc; most start playback automatically.
Step 3 Press Play to begin watching and use Pause or Stop to control playback. If the video does not start, press Menu to select a title or chapter.
Step 4 Use Next/Prev or Chapter/Title to move between sections, and adjust volume with the DVD remote or TV controls.
2. Using a DVD Player with On-Screen Menu
Step 1 Insert the DVD and close the tray, then wait for the Title/Menu screen to appear showing options like Play Movie or Chapter Selection.
Step 2 Use the remote Arrow keys to highlight Play Movie or Start and press Enter/OK.
Step 3 Use Menu, Chapter Select, or Audio/Subtitles buttons to navigate or change settings.
Step 4 Press Stop twice to return to the main menu.
3. Using a DVD Player Connected via HDMI
Step 1 Connect the DVD player to your TV HDMI port and set the TV Input/Source to the correct port.
Step 2 Insert the DVD and press Play. If the TV does not switch automatically, select the input manually.
Step 3 Use the remote Menu, Next/Prev, or Chapter Select to navigate the movie or features. Adjust volume as needed.
4. Using a DVD Player with Component/Composite Cables
Step 1 Connect the Red/White audio and Yellow video cables from the DVD player to the TV and set the TV Input to match.
Step 2 Insert the DVD and press Play. Wait for the disc to load if necessary.
Step 3 Use Pause, Fast-Forward, or Reverse to navigate, and check the TV aspect ratio to avoid stretching.
Part 7. Troubleshooting Netflix DVD Problems
As long as the format is correct, the DVD should play in your player. If the disc fails to burn or does not play properly, the problem is usually caused by incompatible file formats, too-fast burning speeds, or other factors, and can often be fixed with a few adjustments.
-

Problem 1: "Burn Failed" Error
Burn failures are usually caused by speed, disc quality, or system strain. High-speed burns may seem fast but often fail. Drop the speed to 4x or 8x to give the laser more time and reduce errors. Low-quality discs are another common culprit. If the burn stops, try a different brand and restart your computer before retrying. On Windows, outdated DVD drivers or background programs can also interfere. Updating the driver and closing unnecessary apps usually resolves the issue.
-
Problem 2: DVD Burns but Won't Play in Player
If the disc burns but does not play in a DVD player, the problem is usually the format, not the burn itself. A data disc with MP4 files will not work. You need a proper DVD-Video disc with the VIDEO_TS folder structure created by authoring software. Test the disc on a computer first. If it plays there but not on a DVD player, the player may not support DVD+R or dual-layer discs. Switching to DVD-R often fixes the issue.
-
Problem 3: Audio but No Video or Vice Versa
If you hear sound but see no picture, or vice versa, the problem is usually codec or source file issues. Converting the video to a standard format before importing helps. MP4 with H.264 video and AAC audio works reliably. Make sure to use the correct resolution: NTSC discs use 720×480, and PAL discs use 720×576. After converting, re-import the file and burn the disc again.
-
Problem 4: Video Doesn't Fit on the Disc
A single-layer DVD-5 holds about 4.7 GB, about two hours of video. A dual-layer DVD-9 holds about 8.5 GB but may not work on all players. If your project is too large, lower the bitrate, use a dual-layer disc, or split the video across two discs.

Conclusion:
By using tools like ViWizard Netflix Video Downloader, you can download and save Netflix videos. Remember, while creating DVDs for personal use can enhance your viewing experience and ensure you have access to your favorite shows and movies, it's essential to adhere to legal guidelines.
You May Be Interested


Dave Henry, a multimedia technologist at ViWizard, focuses on delivering the best solutions for digital media challenges, including audio and video conversion, media optimization, and troubleshooting.
Leave a Comment (0)