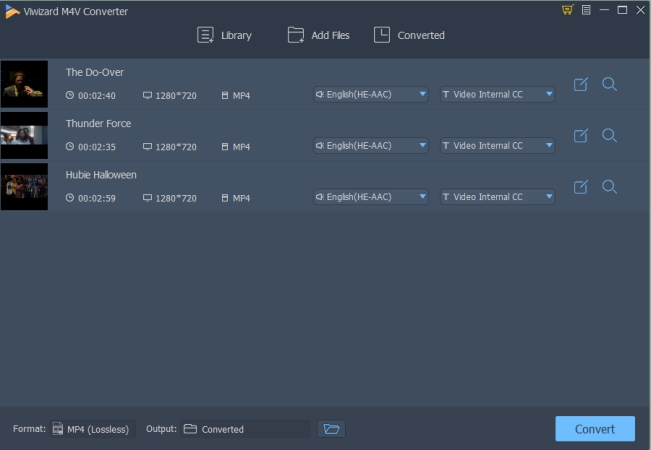
iMovie, as a proprietary video editing software application sold by Apple, is an ideal video editing tool for Mac users to make home movies with customized subtitles, effects and transactions. Besides, it supports a variety of video footages imported from different sources, like hard drives, HDV camcorders, QuickTime, etc. However, if you attempt to import a movie file from iTunes to iMovie for further editing, you will probably encounter the problem that it doesn't allow you to do so, just like the one below:
"I want to make a video clip containing highlights of some iTunes movies with iMovie on my MacBook Pro. But when I tried to import the movie files from iTunes library to iMovie, they appeared to be grey out and won't allow me to select from. How can I manage to add those iTunes movies to iMovie if possible?"
If you also failed to import iTunes videos to iMovie, you may follow the tips below to find out an effective work-around.
How to Enable iTunes Movies Editable with iMovie
Before importing iTunes videos into iMovie, you need to know the fact that movies and TV shows, no matter purchased or rented from iTunes, are all M4V files encrypted with Apple's FairPlay DRM protection, in which way they are prevented from being directly shared to other platforms. In this case, you can't directly import the iTunes M4V movies to iMovie for sharing to others. In order to make iTunes movies editable in iMovie, you must remove the DRM protection from iTunes movies and convert the protected M4V videos to iMovie compatible video formats, including MPEG-4, .mov, HDV and AVCHD.
Among all those iTunes DRM removal tools in the market, TunesKit iTunes to iMovie Converter for Mac is the best one in removing DRM from iTunes movies and converting DRM-ed M4V to unprotected MP4 supported by iMovie and any other media programs and portable devices. With this smart iTunes M4V to iMovie Video Converter, you are able to get non-DRM and iMovie compatible iTunes movies within seconds.
Steps to Convert DRM-ed iTunes Videos to iMovie
After installing TunesKit iTunes to iMovie Converter on your Mac, follow the tutorial to convert DRM iTunes M4V videos to iMovie in 4 steps only.
Step 1Add Protected iTunes M4V Video Files
Click "Add Files" button in the program to select DRM iTunes movies or TV shows that you want to import into iMovie. Click "OK" to load the M4V video files. Drag & Drop is also supported to import iTunes movies.
Step 2Select Output Audio Tracks and Subtitles
Click "Settings" icon in the movie list to customize the audio track and subtitles for output MP4 videos.
Step 3Start to Convert iTunes Movies to MP4 for iMovie
Click "Convert" button to begin to remove the DRM protection and convert iTunes M4V videos to iMovie supported MP4 format.
Step 4Import Converted iTunes Videos to iMovie
After conversion, you can find the converted DRM-free iTunes movies and import them into iMovie by clicking the iMovie menu bar "File > Import > Movies".
- How to Edit iTunes Videos with Final Cut Pro
- How to Import iTunes Movies into Movie Maker
- iMovie vs. Final Cut Pro Comparison
- Import iTunes M4V movies to Adobe Premiere
- Add iTunes Movies to Edit with iBooks Author
- How to Trim iTunes Movies by Chapters
- Easiest Way to Edit iTunes DRM M4V on Computer
- Best Way to Edit Spotify Music with iMovie

Fatima Cook An amateur writer from Freelance, who is skillful at technology review, news and tips.