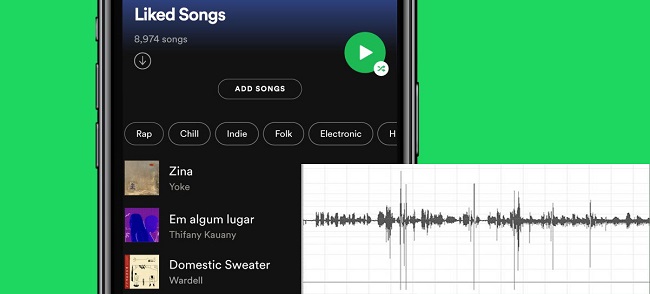
Think of the Curated Playlists, suggested tracks, and the mixes. Well, it is Spotify's algorithm that pulls them out of the corners for you. But at times, you may not like the intros of some songs despite being the best collection from the Spotify algorithm or your customized playlist. Many users have been bothered by how to edit songs on Spotify for a long time. This is especially after Spotify shut down the “Line In” feature in its latest app. Don't worry! This article will explore a possible way to edit Spotify playlists and songs alike.

Have you ever wanted to customize music on Spotify and make it your special one? Here's how to cut music from Spotify.
Part 1. How to Edit a Playlist's Order on Spotify
If you want to edit a playlist songs order on Spotify, you're basically changing the songs order in your playlist. You can either use Spotify's "Sort" function or customize the order of the songs depending on the device. In the Spotify app for desktop and mobile, "Sort" lets you view or stream lists in a particular order, while "Custom order" can let you customize the songs in the order you want.

Here we offer instruction to sort or customize to change order of songs on Spotify playlists on desktop and mobile. Come here to check!
For Windows/Mac:
- Spotify desktop users can edit the songs order by using either "Sort" or "Custom order" to make it work for you.
- On Windows or Mac, open the Spotify app for desktop.
- In the left menu, go to the playlist whose order you want to edit.
- From here you have 2 options to change the songs order in this playlist:
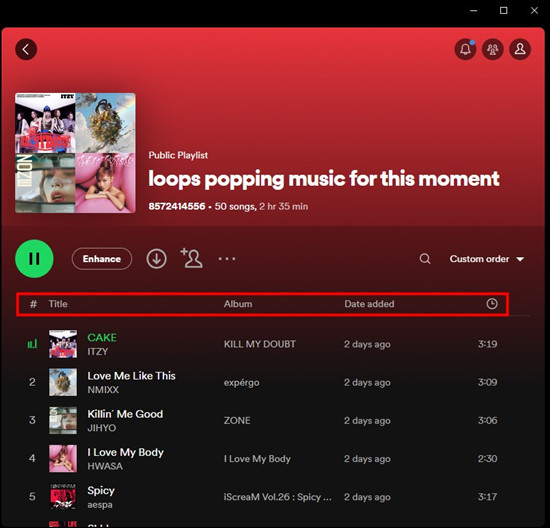
- To Sort the songs in the playlist: Click on TITLE, ALBUM, DATE ADDED, Duration (Clock icon) at the column header. Or click on the Chevron down icon to select Custom order, Title, Artist, Album, Date added or Duration from the dropdown.
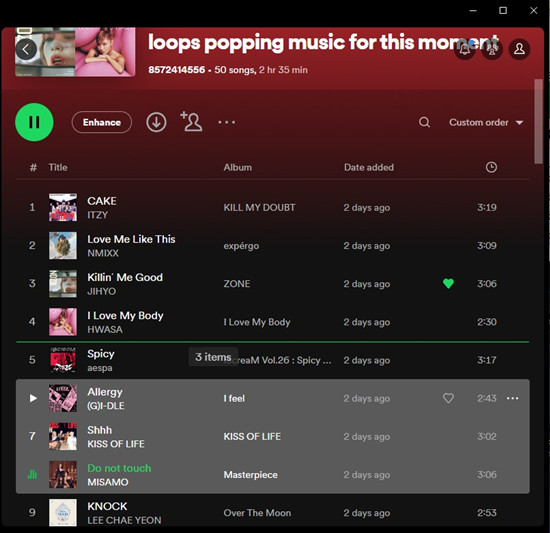
- To customize the songs order of the playlist: Select one particular song or multiple songs and pin it the preferred position in the playlist via drags-and-drops.
For iOS/Android:
If you have edited the playlist songs order in Spotify desktop app, you don't have to do this again on your mobile because Spotify will sync these changes to its mobile app simultaneously. While both Premium and free users can customize the songs order of the playlist on desktop, only Premium users can use "Edit" to sort the songs on mobile.
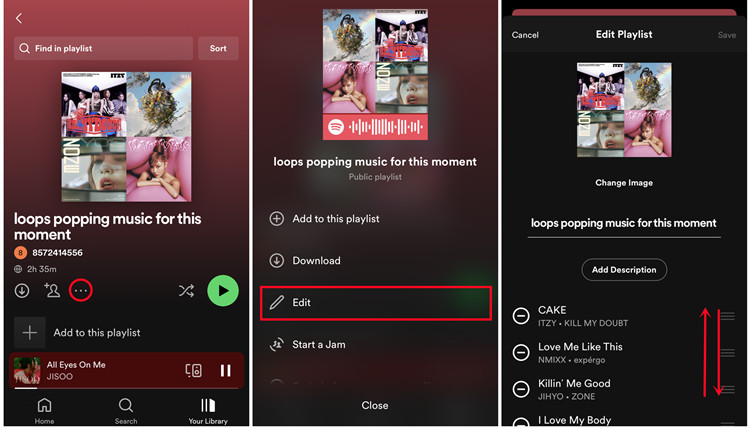
- On iOS or Android, open the Spotify app for mobile.
- Go to Your Library.
- Go into the desired playlist.
- Tap on the "More options" button.
- Scroll down and tap the "Edit" option.
- Hold and drag the song individually to the preferred position.
- Once done, tap on "Save" button.
Part 2. How to Edit a Playlist's Details on Spotify
Spotify offer an option for users to added their own created playlists on Spotify. If you want to edit your playlist on Spotify, you can follow these steps on your devices.
Note: You'll need a device to edit a playlist on Spotify only. Once edited, Spotify will sync the changes to another device connected to this Spotify account.
For Windows/Mac:
Windows and Mac users can choose to edit the name, description, and display photo of your playlist in the same place. You can also scroll to edit one particular item only.
To Edit the Playlist Name/Description/Photo:
- On Windows or Mac, open the Spotify app for desktop.
- In the left menu, go to the playlist you want to edit. From here you can right-click on the playlist > Edit details to kick start.
- Alternatively, click [Your Playlist's Name] section. If the playlist is created by you, it's editable and the "Edit details" window appears on the screen.
- From here you have multiple options to edit the selected playlist.
- To change the name of the playlist: Click the "Name" section, and then enter the name you want for this playlist.
- To add/change an optional description to the playlist: Click the "Description" section, and then enter the description you want for this playlist.
- To change the display photo of the playlist: Click the "Playlist display photo" section (Choose photo button), and then open the desired file in the pop-up.
- Once edited, click the "Save" button to keep these changes.
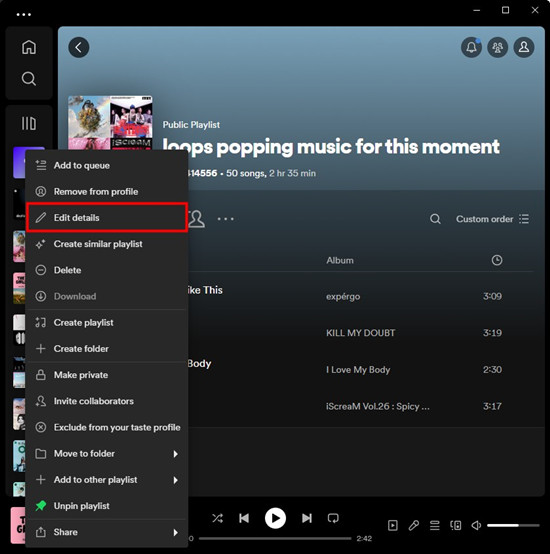
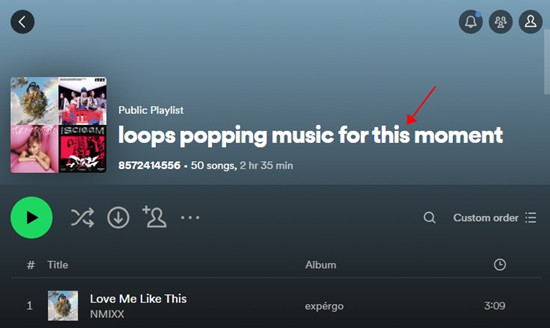
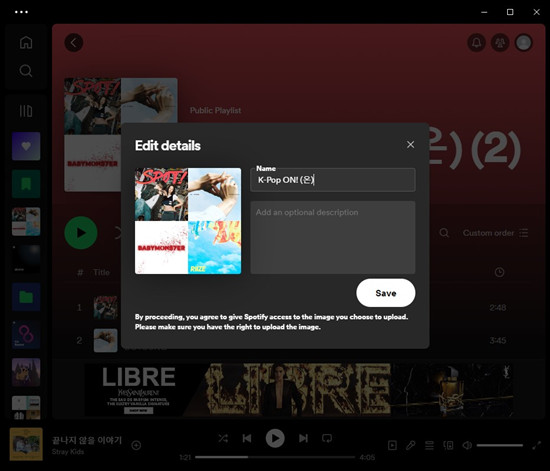
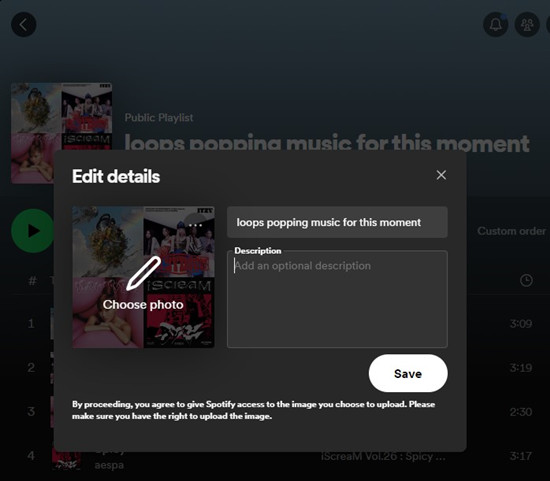
Note: Please make sure you have the right to upload the image.
To Edit the Playlist Description Only:

- On desktop, go into the desired playlist in the side menu.
- In the upper playlist section, click the description of it under [Your Playlist's Name].
- In the pop-up, edit the description.
- Click the "Save" button.
To Edit the Playlist Photo Only:
- On desktop, go into the desired playlist in the side menu.
- In the upper playlist section, click the display photo of it ("Choose photo" button).
- In the pop-up, use Finder or Files Explorer to navigate to the photo you want for the selected playlist.
- Once Selected, click the "Open" button.
- Click the "Save" button to save this change with the playlist photo only.
For iOS/Android:
If you are on an iOS or Android device, you can also choose to edit a playlist in the Spotify mobile app.
To Edit the Playlist Name/Description/Photo:
- On iOS or Android, open the Spotify app for mobile.
- Go to Your Library.
- Scroll to the playlist you want to edit.
- Go into the selected playlist.
- Click the More button (3 dots icon) > Edit. From here you can start to edit the name, display photo, and description of it.
- To change the name of the playlist: Click the "Name" section, and then enter the name you want for this playlist.
- To add/change an optional description to the playlist: Click the "Description" section, and then enter the description you want for this playlist.
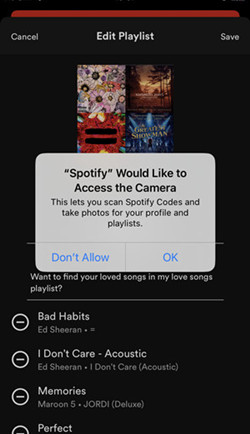
- To change the display photo of the playlist: Click the "Playlist display photo" > Choose from library/Take photo, and then open the desired file or create a new photo for it in the pop-up.
- Once changes, click the "Save" button in the upper right corner to keep these changes.
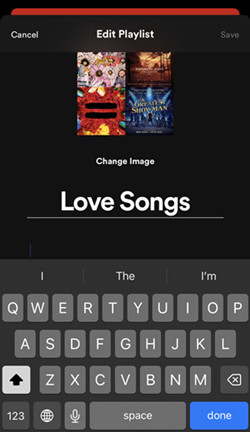
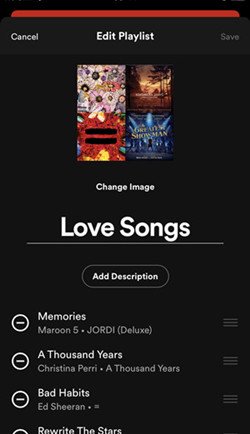
Note: For the "Take photo" option, you'll need to give the camera access to Spotify. For the "Choose from library" option, you'll need to be sure you have the right to upload the image.
Part 3. How to Edit a Song from Spotify [ViWizard Audio Capture]
Spotify is a fantastic platform for music, but sometimes its in-add editing options may not meet the specific needs of users looking to make more advanced changes to their favorite songs. While Spotify offers basic editing features like volume control and crossfade, these may not be sufficient for users seeking more nuanced modifications. We'll explore to how Spotify users can go beyond the basic editing features of Spotify and gain more control over your music, such as the ability to edit and change specific parts of a song.
Introducing ViWizard Audio Capture, an innovative tool designed to empower Spotify users with the ability to capture and edit audio directly from the platform. This all-in-one solution caters to both Premium and free users, delivering a seamless experience for capturing and editing Spotify audio with uncompromised lossless quality. Whether you're curating playlists or tweaking individual tracks, ViWizard Audio Capture offers a user-friendly approach to enhancing your Spotify experience.
Key Editing Features of ViWizard Audio Capture:
- Capture entire playlists or multiple songs simultaneously, streamlining the editing process.
- Combine captured songs into a single file for a cohesive listening experience.
- Dive into the details by cutting, trimming, and adjusting specific segments of a song for a tailor-made auditory journey.
- Personalize your music library further by editing tags to your liking, ensuring a seamless organizational experience.
ViWizard Audio Capture stands as a powerful ally for music enthusiasts, providing a comprehensive toolset that elevates the customization of your music library. It acts as a bridge to advanced and personalized editing possibilities, offering a rich, user-friendly experience.
Key Features of ViWizard Audio Capture
Free Trial Free Trial* Security verified. 5, 481,347 people have downloaded it.
- Capture Spotify audios, songs, and playlists in high quality
- Save audio from Spotify to MP3, AAC, M4A, WAV, FLAC, M4B
- Support multi-track audio recording for Spotify
- Record music from Tidal, Deezer, Pandora and other streaming audios
Capturing and Editing Spotify Songs Using Audio Capture:
The process of capturing and refining your beloved Spotify songs is effortlessly streamlined with ViWizard Audio Capture.
Step 1Download and Install ViWizard Audio Capture
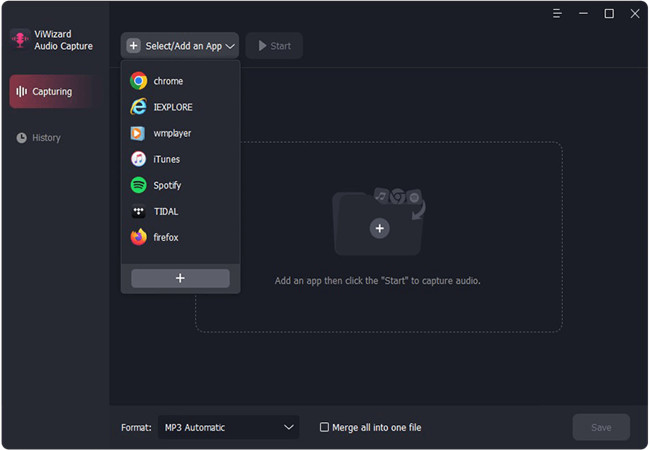
Begin the process by downloading and installing ViWizard Audio Capture on your computer. Once installation is complete, launch the software and ensure that your Spotify application is running in the background.
Step 2Configure Capture Settings
Before capturing audio from Spotify, configure the capture settings within ViWizard Audio Capture. Navigate to the "Format" button located in the bottom-right corner of the main interface. Choose your preferred output format for the captured audio - options like MP3, M4A, or WAV. Confirm your selection by clicking "OK."
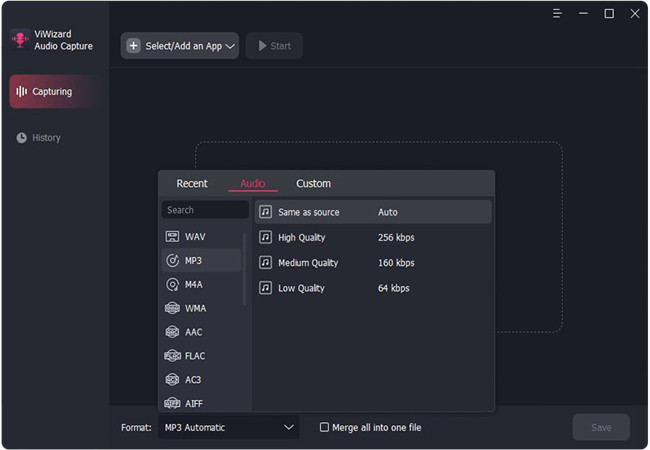
Step 3Record the Spotify Music Track
Open the Spotify app directly from the ViWizard Audio Capture interface. Identify the songs or playlists you wish to edit and start playing it on Spotify. ViWizard Audio Capture provides flexibility through both bulk capture and individual song selection, catering to your specific editing needs. Select "Merge all into one file" on the bottom right to merge songs into a unified file for a cohesive listening experience in this Step.
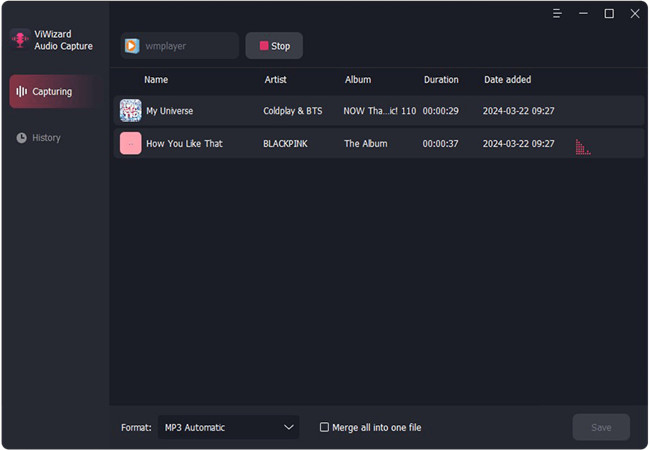
Step 4Edit and Trim the Captured Audio
Once the desired audio has been captured, click on the "Stop" button within ViWizard Audio Capture to conclude the capturing process. Now, hover your mouse over the audio file and click on the "Edit" icon. You can now explore the "Trim" tab to execute detailed edits, like triming the captured audio to remove any unnecessary segments. If you need to edit the ID3 tags, just go to the "Tag" tab.
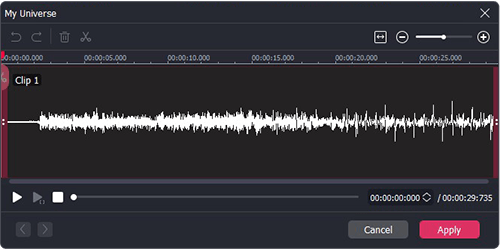
Step 5Export the Edited Audio
After editing and trimming the captured audio to perfection, export the edited file(s). Click on the "Save" button within the ViWizard Capture list. Access the file through the History window and locate it in your designated destination folder. Congratulations, your edited file(s) can be transferred to your device.
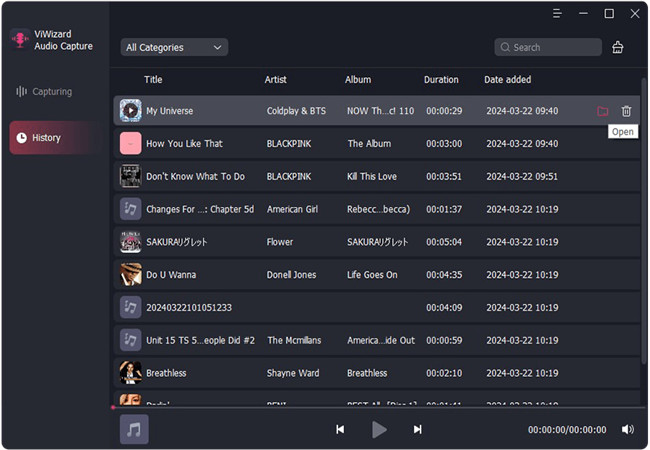
Part 4. How to Edit a Song from Spotify [ViWizard Spotify Music Converter & Audacity]
In Part 1, we introduced ViWizard Audio Capture as an all-encompassing solution for capturing, editing, and exporting Spotify songs. Now, let's explore an expanded toolkit for those whose ambitions extend beyond basic editing - introducing ViWizard Spotify Music Converter and Audacity.
For users seeking not only editing capabilities but also the ability to convert and download Spotify music into various formats such as MP3, M4A, M4B, WAV, AAC, and FLAC, ViWizard suggests integrating ViWizard Spotify Music Converter into your toolkit. This specialized converter seamlessly collaborates with editing tools like Audacity, offering enhanced versatility for refining your Spotify music collection.
Key Features of ViWizard Spotify Music Converter:
- ViWizard Spotify Music Converter stands out with its capability for batch downloading, allowing you to save time and effort when dealing with multiple songs.
- Experience a significantly faster conversion speed compared to ViWizard Audio Capture, with up to 5x speed on Windows. This accelerated process ensures swift and efficient conversion.
- Spotify automatically preserves and embeds the full ID3 tags to your music during the conversion process, maintaining essential metadata for a seamless listening experience.
ViWizard Audio Capture V.S. ViWizard Spotify Music Converter
While ViWizard Audio Capture captures a list of audios in real time, ViWizard Spotify Music Converter offers a distinct advantage with its batch downloading capability and superior conversion speed. The integration of these tools provides a comprehensive solution for users looking to refine and customize their Spotify music collection with efficiency and precision.
Key Features of ViWizard Spotify Music Converter
Free Trial Free Trial* Security verified. 5, 481,347 people have downloaded it.
- Download Spotify songs, albums, playlists, podcasts, audiobooks
- Convert Spotify music to lossless MP3, AAC, FLAC, WAV, M4A, M4B
- Support playing offline Spotify music on any device at any time
- Compatible with Windows and macOS, as well as, the latest Spotify
Limited-Time Offer for Spotify Music Converter
Get 20% off your monthly license. Use the code at checkout.
Converting and Downloading Spotify Songs Using Spotify Music Converter:
Designed with user convenience in mind, ViWizard boasts an intuitive and user-friendly interface. First of all, you need to download and install ViWizard Spotify Music Converter from the link above on your Mac or PC. Then follow the instructions below to learn how to download music from Spotify to MP3 for listening on any device or player.
Step 1Download and Register ViWizard Converter
ViWizard works on both Windows and Mac OS devices. To download the app, head to its website and choose your device operating system version and click the Download button. Then install and launch the app on your computer and the Spotify app should also open immediately. Remember, you need to register the converter tool to enable you to convert files beyond one-minute free version limit. So, click the Menu tab > Register option. Then enter the email address that you used to acquire the license plus the registration code in the respective boxes.
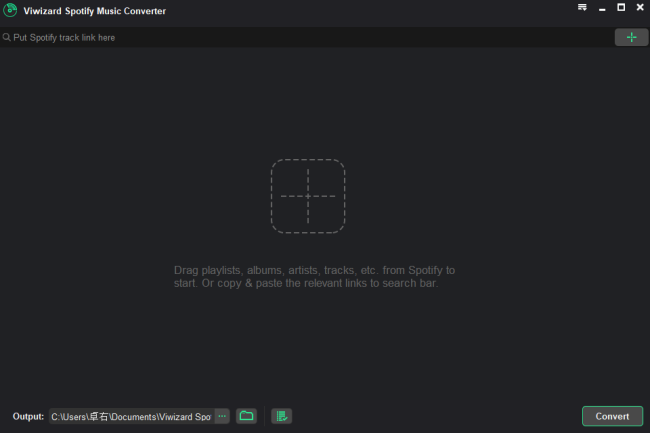
Step 2Add Spotify Playlist
Check the Spotify app for the songs you want to add and convert. You can just drag and drop the songs to the ViWizard interface or copy and paste the URL links of the songs to the search box.
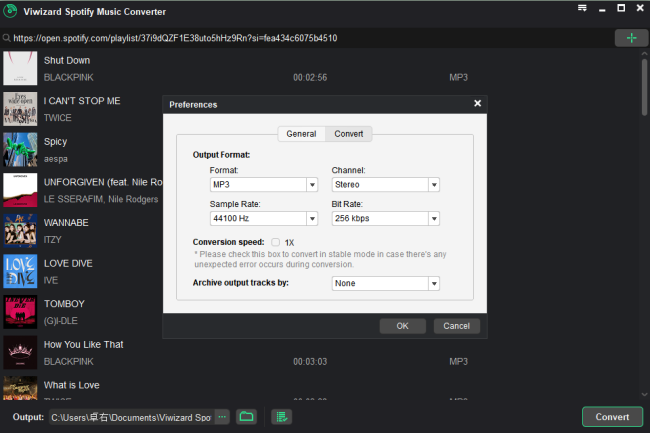
Step 3Customize Output Format and Music Preferences
It is your preferences that matter. Customize the output format and music parameters to your likeness. Just click the Menu tab and go to the Preferences option to select the output format. Also, easily adjust the audio channel, sample rate, and bit rate to the specifications of your choice.
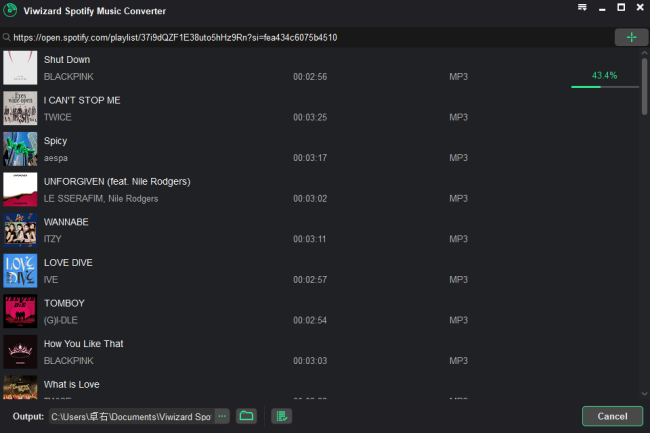
Step 4Convert Spotify Songs to MP3
Check your settings and then click on the Convert button to start the conversion process. Once the process completes, locate the converted Spotify songs in the History folder of your computer's local disk. You can now go-ahead to edit your songs by trimming, merging, cutting out a portion, among other edits. However, you need to transfer the songs to an Audio Editor tool to continue with the process.
Editing ViWizard-Converted Spotify Songs Using Audacity:
Now that you've got your Spotify songs converted, let's make them truly yours by editing with Audacity. For even more advanced and creative editing, Audacity remains a powerful choice. Audacity is a handy audio editor that supports various formats, including MP3 and WAV.

Having trouble downloading music from Spotify and play on your own player? Try using Audacity to record them as many as you wish.
- Make sure Audacity is installed on your computer. Locate your converted Spotify files in their designated folder.
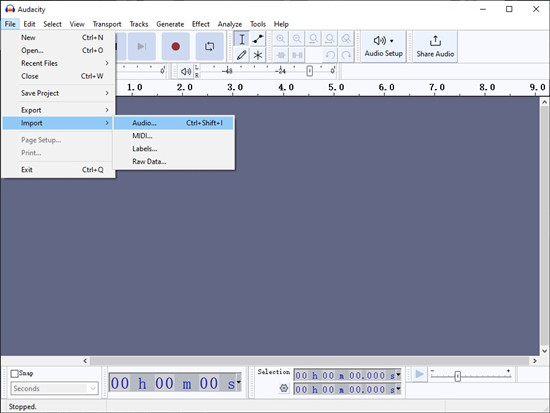
- Open Audacity and import the song you want to edit. You can either go to File > Import > Audio or just drag and drop the file into Audacity.
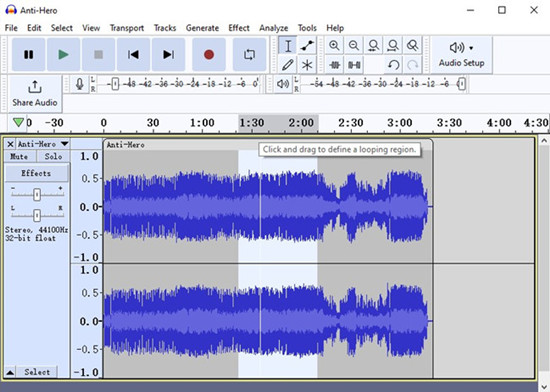
- Your song will appear as a wave. Use these simple tools in Audacity:
- To use Audacity Selection Tool: Click on the Selection tool and select the region you want. You press the Delete on the keyboard to delete the selected region.
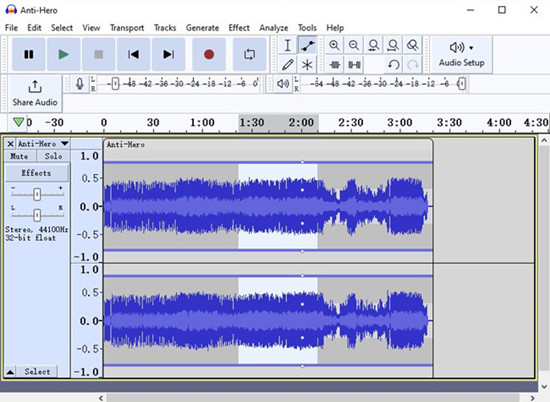
- To use Audacity Envelop Tool: Click on the Envelop tool and shape to drag the audio to make the it louder or quieter. You can also pin on the some envelop points to make a region fade in or fade out.
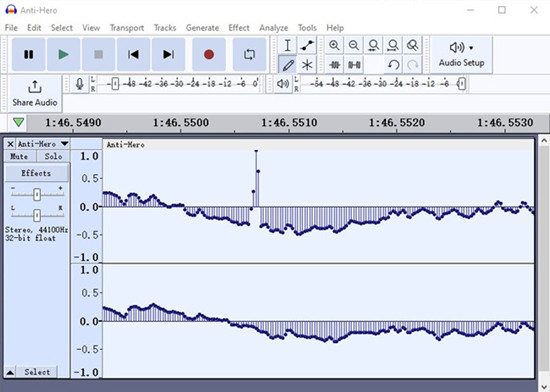
- To use Audacity Draw Tool: Click on the Draw tool and use Zoom in or Zoom out tool. Zoom in further until there're the individual samples to draw with.
- To use Multi-Tool: You can use Multi-Tool to bring all the tools above work together. Click on the Multi-Tool and make it work for you.
- You can do additional edits:
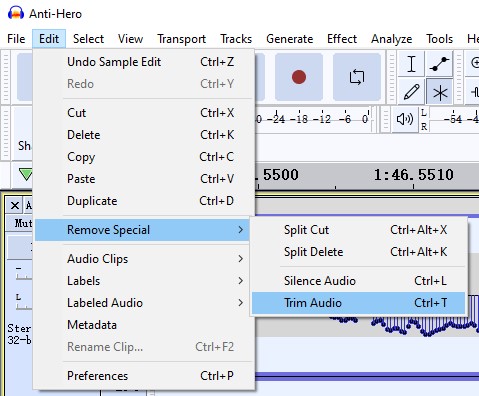
- To trim your track: Click on the Edit > Remove Special > Trim Audio option.
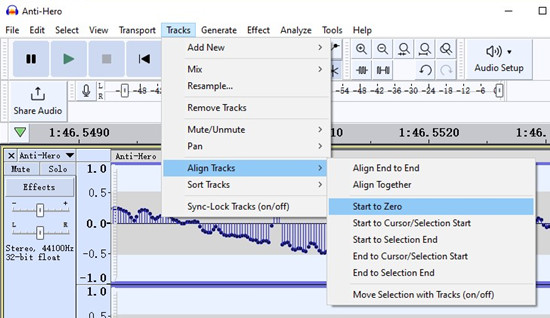
- To move the audio to the beginning of the track: Click the Tracks > Align Tracks > Start to Zero.
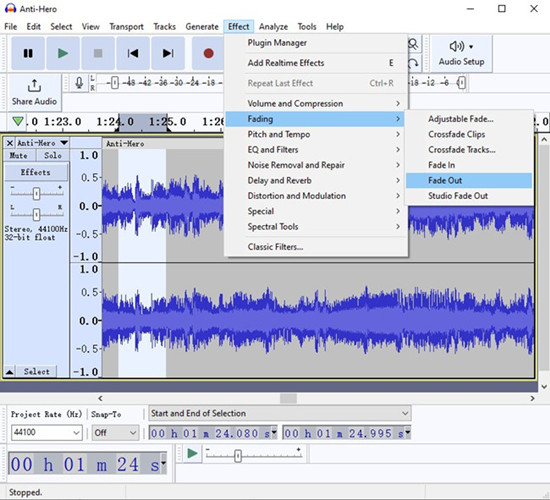
- To fade out the last second: Click on the Waveform about 1 second before the end. Then click on the Select option > Region > Cursor to Track End > Effects > Fade Out. You can also try out other editing features from the Edit menu.
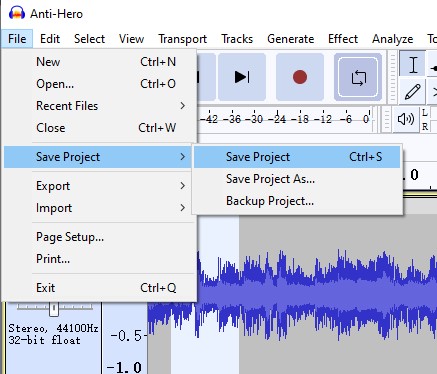
- After your tweaks, save your project by clicking File > Save Project.
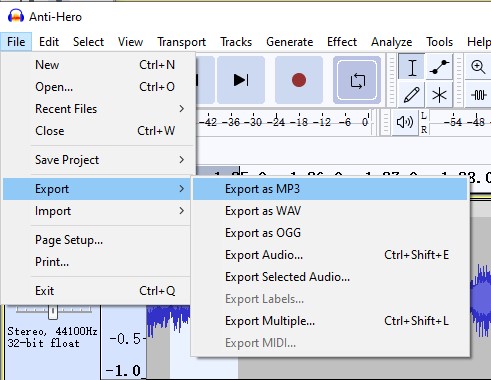
- Export your masterpiece by clicking File > Export > Export Audio. Choose the format you prefer, and voila! Your edited Spotify track is ready for sharing.

With these steps, you can make your Spotify songs uniquely yours using Audacity, adding that personal touch to your music collection.
Conclusion
In this post, we have offered a solution for editing your Spotify music. Even though Spotify doesn't provide a direct way to edit its tracks, you can follow this article and learn how to edit your music in Spotify. You, first, need to convert Spotify songs with ViWizard Spotify Music Converter and then enable direct editing via Audacity Audio Editor. It is not that hard actually. Moreover, once you have the converted songs, you can play Spotify in your car or any other device. Just come and try the ViWizard and enjoy the music!




Leave a Comment (0)