Are you trying to add your favorite Amazon Music tracks to iMovie for your next video project? Unfortunately, Amazon Music is protected by DRM, which prevents you from directly importing songs into iMovie. But don't worry — with the right tools and a few simple steps, you can convert Amazon Music into iMovie-compatible formats like MP3, import them into your project, and use them as background music for personal use.
Whether you're editing a personal vlog, a presentation, or a creative project, let's explore this step-by-step tutorial to make it easy to enjoy your Amazon Music library in iMovie.

Step 1: Convert Amazon Music to iMovie-Compatible Format
Before you can add Amazon Music to iMovie, the first step is to convert your songs into a format that iMovie supports. Read the chart below to get the available audio format on iMovie and Amazon Music:
| Services | Supported Audio Format |
| iMovie | AAC, MP3, WAV, AIFF, M4A |
| Amazon Music | MP3, FLAC |
Even the format is compatible with iMovie, Amazon Music tracks are usually protected by DRM and cannot be imported directly. You must first convert them to one of the supported formats (MP3, WAV, etc.) using a professional Amazon Music Converter to remove the Amazon Music DRM.
Tool Required: ViWizard Amazon Music Downloader
Download songs, playlists, albums, and your whole music library from 10 major streaming platforms, including Amazon Music, to MP3, FLAC, WAV, AIFF, M4A, or M4B with original quality and ID3 tags for permanent offline listening.
ViWizard Amazon Music Downloader features the best DRM-removal tool for Amazon Music contents. You just need to download the Mac version of this ViWizard software, you can customize the output format for the desired contents as MP3 or WAV. Later after the conversion, the DRM-free Amazon Music files are yours to use with iMovie.
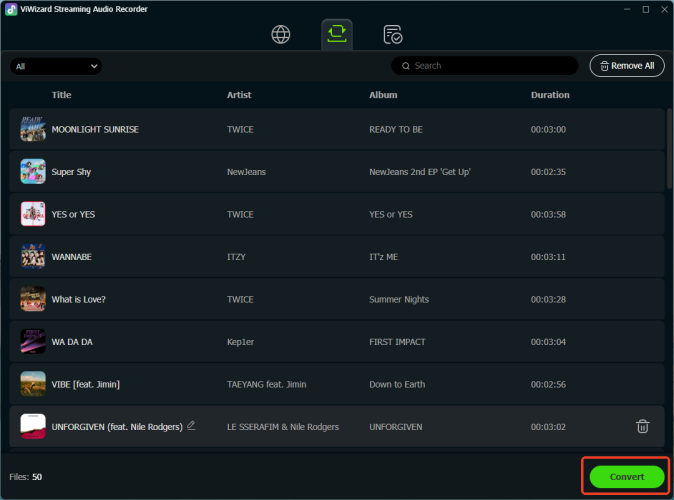
Install and open ViWizard Amazon Music Downloader on your computer.
Click Menu > Conversion > Output Format, select MP3 and choose audio quality (64–256 kbps), then click OK.

Click the Amazon Music icon and log in with your account.

Find the songs, albums, or playlists you want and click Add to List.
![]()
Click Convert to start downloading and converting the tracks you want to add as the background to your iMovie project.
Step 2: Import Amazon Music into iMovie
After ViWizard successfully converts the Amazon Music to your local, now all the songs you need from Amazon Music are completely out of control. The protection from digital rights management has been removed, so you can use Amazon Music songs in your video when using iMovie. You can navigate to the designated folder of Amazon Music downloads and transfer them to iMovie on your Mac or iPhone for background editing.
For Mac
Open iMovie on your Mac.
Create a new project or open an existing one.
Click File > Import Media from the top menu.

Navigate to the folder where your converted Amazon Music files are stored.
Select the tracks you want to import and click Import Selected. And then your music files will appear in the Media Library.
For iPhone
Connect your iPhone and Mac via a USB cable, and then you can launch Finder on the Mac to transfer downloaded Amazon Music's tracks to iPhone.
Locate your iPhone and select Music from the button bar, and check the Sync Music box.

Select the downloaded Amazon Music content, and then you can click on Apple to start transferring.
Open iMovie on your phone and create or open a project.
Tap the Add Media (+) > Audio > Files option.
Browse to the location of your converted Amazon Music files and select the track you want to add.

Step 3: Add Amazon Music as Background Music to Your Timeline
After importing your converted Amazon Music tracks into iMovie, the next step is to add them to your video timeline as background music.
For Mac
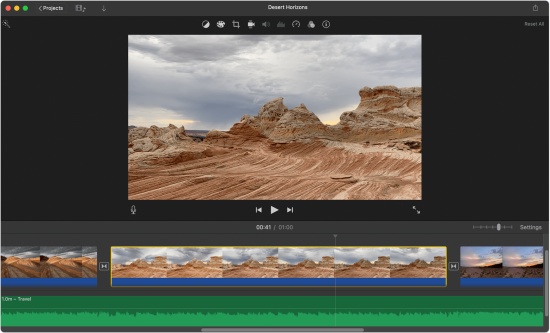
Drag the track from the Media Library directly onto your project timeline. iMovie automatically places it as background music.
Trim or split the track as needed to match the length of your video. Use the split (Cmd+B) or trim handles to adjust the start and end points.
And now you can click the audio track, then drag the volume slider up or down to adjust the track's volume.
For iPhone
Tap the Add Media button to launch the media browser.
Then tap Audio, tap My Music, and select a category to browse Amazon songs stored on your device.
Locate the song you want to add, tap the Add Audio button next to a song. And iMovie will automatically fit it to the length of the project.
After adding, tap the audio track and drag the Volume slider to adjust the video volume.

Step 4: Export Your iMovie Project with Amazon Music
After adding and syncing your Amazon Music tracks to your iMovie timeline, the final step is to export your project so you can share or upload it with the music fully embedded. Here is how to share your iMovie project with Amazon Music:
For Mac
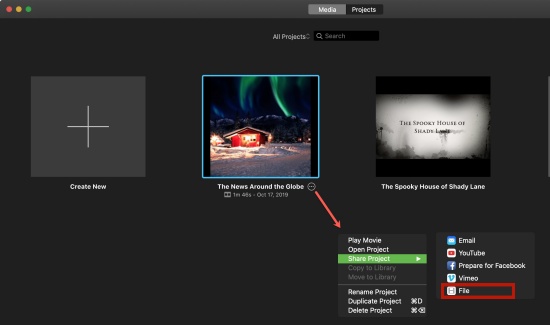
Click File > Share > File from the top menu. In the export settings, choose:
- Resolution: Select the appropriate video size (e.g., 1080p for HD).
- Quality: Choose High or Best (ProRes) for optimal audio and video.
- Compress: Better Quality is recommended to preserve audio fidelity.
Click Next, choose the destination folder, and click Save.
Wait for iMovie to finish exporting. Your Amazon Music will now be embedded in the final video.
For iPhone
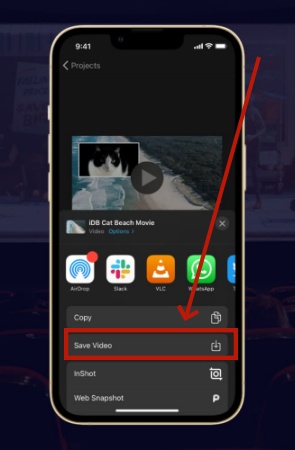
Tap Done to exit the timeline editor.
Tap the Share button (square with an arrow) > Save Video.
Select the desired export resolution (e.g., 1080p for HD).
The video will be saved to your Photos app, including Amazon Music.
Conclusion
Now that you know how to convert and import Amazon Music into iMovie, you can take full control of your video's soundtrack with ViWizard Amazon Music Downloader. From trimming and syncing music on the timeline to adjusting volume and adding fades, these steps give you the flexibility to create professional-quality videos with your favorite tracks. By following this workflow, your iMovie projects will feel more polished, engaging, and uniquely yours — all while keeping your audio legal and high-quality.
You May Be Interested


Adam Gorden, the digital media specialist at ViWizard, is dedicated to providing the best solutions for digital media management, including audio and video conversion, file optimization, and media workflow enhancements.
Leave a Comment (0)