
Apple Music offers a streaming catalog of over 100 million songs, making it easy to build a large personal library over time. As your collection grows, you may end up with thousands of tracks, albums, and playlists you want available offline. However, downloads are not unlimited. Apple Music has a limit of up to 100,000 downloaded songs per account, so very large libraries may not fully fit offline.
Because of this limit, users often look for easier ways to manage bulk downloads.
For smaller libraries, Smart Playlists are a simple option. You can set rules based on artist, genre, or recently added songs, then download the playlist in bulk as it updates automatically. Another option is creating an All-Songs playlist manually. You simply select all tracks, add them to one playlist, and download it at once. It is easy and organized, but the 100,000-song limit still applies, so very large libraries may not be fully covered.
For bulk downloading, a tool like ViWizard Apple Music Converter can be useful. You can select and download multiple tracks at once instead of one by one. It can also convert songs to MP3 so you can save them locally on your computer for offline use.
- Storage space check: Before downloading a large Apple Music library, make sure your device has enough storage. You can check this in your device settings and remove unused apps, files, or downloads if space is low. Without enough storage, downloads may fail or stop.
- Sync Library setting: Make sure your music library sync feature is turned on so your songs, playlists, and downloads stay consistent across all devices, including iPhone, iPad, and computer. You can enable this in Music settings.
Keep Apple Music songs forever by saving them in formats like MP3 to play anywhere.
Method 1: Download All Apple Music Songs Using an Apple Music Downloader (Unlimited Offline Access)
Apple Music does not provide a built-in option to download an entire library in bulk without limits. ViWizard Apple Music Downloader is often used to manage larger collections with a bulk-download feature. It connects to users' Apple Music libraries and allows multiple tracks to be selected at once instead of downloading songs one by one. After selection, songs can be converted into formats like MP3 and saved to a computer, making them easier to store, organize, and keep as a more permanent offline library.
Tool Required: ViWizard Apple Music Downloader
Users need to install the Windows or Mac version of ViWizard Apple Music Converter. Log in with an Apple ID and password to access Apple Music songs, then add multiple tracks (songs, playlists, albums, and more). After that, choose a format or keep "Lossless," then start downloading at speeds up to 20 times faster than real-time. It also keeps metadata such as titles, artists, albums, artwork, and lyrics.
Downloads can be organized by playlists and albums, reducing the need to sort files manually. This keeps the Apple Music collection structured outside Apple's platform. Even after subscription changes, downloaded songs can still remain accessible across devices, helping preserve entire Apple Music libraries.
Key Features of ViWizard Apple Music Converter
Free Trial Free Trial* Security verified. 5, 481,347 people have downloaded it.
- Convert Apple Music songs, albums, playlists, and artists into MP3 for easy access
- Preserve lossless audio, high-resolution lossless, and Dolby Atmos quality
- Strip DRM from Apple Music for unrestricted offline listening
- Save converted audio files while retaining full ID3 tag details
Step 1Import Songs from Apple Music to ViWizard
After the installation is complete, just launch the ViWizard Audio Converter application on your PC. Then, on the top menu, choose Music Note to load the Apple Music files to rip. Simply drag and drop the music files you want to download into our Apple Music downloader.

Step 2Set Output Formats as MP3
After importing the music into the program, use the Format option to choose the best output format for your needs. MP3 is an excellent format for playing Apple Music on other devices. You may also change the output audio attributes such as sampling rate, bit rate, channel, and so on in the format options box. Finally, click the OK button to save your selections.

Step 3Start to Free Your Apple Music to MP3
Then, to begin the conversion, select the Convert option. As soon as you configure ViWizard, it will begin ripping Apple Music to MP3. After a few seconds, click the Converted button to identify and play all converted MP3 Apple Music files on any device.

Step 1Install ViWizard and Sign In to Apple Music
Download and install ViWizard Apple Music Converter on your Windows PC or Mac, then open the app. On the main screen, use the built-in Apple Music web player to sign in with your Apple ID. Once signed in, your Apple Music library will load inside the interface, including songs, albums, and playlists, so you can start selecting content to convert.
Step 2Choose Output Format and Audio Settings
Before selecting any music, go to the settings or preferences section inside ViWizard. Choose MP3 as the output format for widest device compatibility. You can also adjust audio quality options such as bit rate, sample rate, and channel settings depending on your needs. If you want to keep metadata organized, make sure options like album artwork, song info, or lyrics are enabled if available.
Step 3Select Songs, Albums, or Playlists
Inside the ViWizard library view, browse your Apple Music content just like you would in a normal music app. Start by selecting a few playlists to test conversion and check output quality. Once you confirm everything works properly, you can expand your selection to include full playlists, albums, or your entire Apple Music library. Click the "+" or Add button to move selected items into the conversion list, then click Convert to begin processing your music into local files.
Step 4Find and Use Your Converted Music Files

When conversion is finished, open the History tab inside ViWizard or go directly to the output folder set in your preferences. Your music will be saved as standard audio files without DRM protection, making them playable outside Apple Music. You can transfer files to your phone, copy them to a USB drive, or store them as a backup on your computer. All key metadata such as track names, album titles, and artwork will remain included, helping keep your library organized.
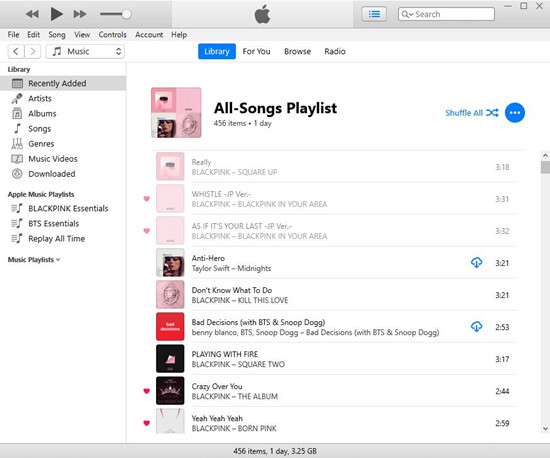
Method 2: Download All Apple Music Songs by Creating an All-Songs Playlist (Windows / Mac)
Apple Music supports playlists as an option to group songs and download them together, usually more convenient on a computer. Go to the "Songs" section, press Ctrl + A to select all tracks, then add them to an "All-Songs Playlist." Once created, downloading it saves the entire collection in one action, treated by Apple Music as a single downloadable unit. This is simple for bulk downloads, though the 100,000-song library limit still applies.
Step 1 Open iTunes on Windows or open the Music app on Mac, then sign in with your Apple ID.
Step 2 In the left sidebar, click Songs under Library to view all tracks in your music collection.
Step 3 Select all songs in the list:
- Windows: Press Ctrl + A
- Mac: Press Command + A
Step 4 Right-click or Control-click the selection, then choose Add to Playlist and select New Playlist.
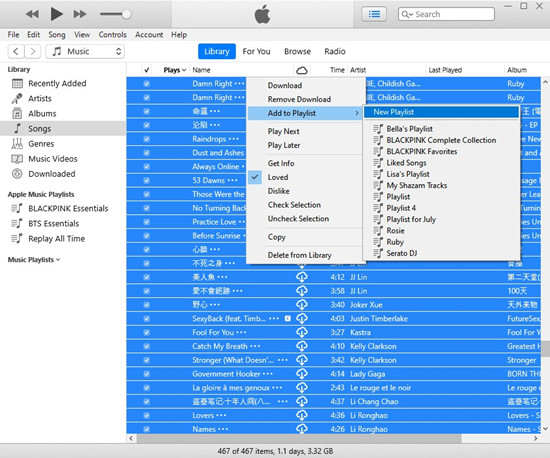
Step 5 Wait for the playlist to be created, especially if your library is large.
Step 6 Go to Playlists in the left sidebar and open the new playlist that contains all songs.
Step 7 Click the download icon next to the playlist to download everything for offline listening, making sure your device has enough storage space.
Method 3: Download All Apple Music Songs by Creating a Smart Playlist (Windows / Mac)
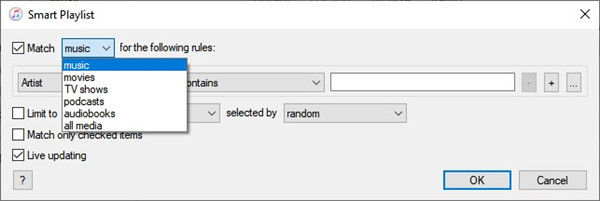
Smart Playlists automatically organize songs based on set rules instead of manual selection. Filters can include artist, genre, or recently added tracks, and the playlist updates as the library changes. Once created, it can be downloaded like a normal playlist, keeping the offline collection aligned with those rules without frequent manual updates.
Step 1 Open iTunes on Windows or the Music app on Mac, then go to the top menu bar.
Step 2 Click File, choose New, then select Smart Playlist.

Step 3 Set rules to include all music in your library by selecting Music as the media kind with the rule "Time is greater than 00:00".
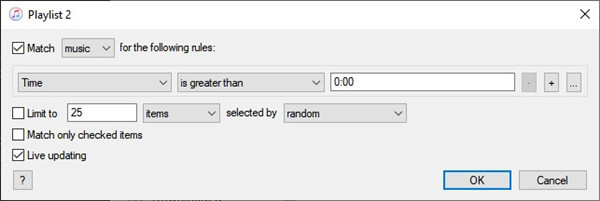
Step 4 Turn on Live Updating so the playlist automatically includes new songs added to your library.
Step 5 Click OK to create the Smart Playlist, then find it in the Playlists section of the sidebar.
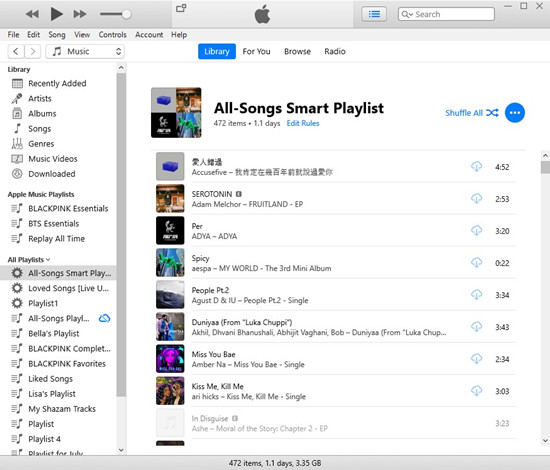
Step 6 Open the playlist and click the download icon to save all songs offline, with automatic updates when your library changes.
Method 4: Download All Apple Music Songs Using iOS Shortcuts Automation (iOS)
On iPhone and iPad, Apple's Shortcuts app can reduce manual steps in organizing music. A shortcut such as "Add Entire Library To Playlist" can gather all songs into one playlist automatically. After creation, the playlist can be downloaded for offline listening like any other playlist.
Step 1 Open Settings on your iPhone or iPad and make sure Apple Music is enabled with an active subscription.
Step 2 Open the Music app, go to Library, then tap Playlists and create a playlist named Full Library.
Step 3 Install or open the Shortcuts app on your device if it is not already installed.
Step 4 Add the shortcut Add Entire Library To Playlist, then open it inside the Shortcuts app.

Step 5 Run the shortcut and allow access to your Music library so it can add all songs automatically.
Step 6 Go back to the Music app and open the Full Library playlist, and wait if it is still populating.
Step 7 Tap the download icon in the top right corner to download all songs for offline use, making sure your device has enough storage space.
Method 5: Download All Apple Music Songs Using Automatic Download Settings (Windows / Mac and iOS)
Apple Music includes an Automatic Downloads option that keeps music available offline as new songs are added. In Music settings, enable "Automatic Downloads," and any new track added to the library will download in the background without manual action. It does not download the existing library at once, but helps the offline collection grow automatically over time.
On iPhone or iPad

Step 1 Open Settings, then tap Apps.
Step 2 Scroll down and select Music.
Step 3 Turn on Automatic Downloads so any song added to your library is saved automatically for offline listening.
On Mac
Step 1 Open the Music app, then click Music in the top menu bar.
Step 2 Go to Settings, then open the General or Downloads tab.
Step 3 Turn on Automatic Downloads to save new songs automatically.
Pro Tip: Delete All Downloaded Apple Music Songs in One Click (iOS)
Apple Music includes built-in storage tools for removing downloaded music in bulk. Go to Settings > Apps > Music > Downloaded Music or Settings > General > iPhone Storage > Music, then remove all downloaded songs at once. This is useful for freeing up space or resetting offline downloads before rebuilding the library using another method.
Option 1: Downloaded Music
Step 1 Open Settings on your iPhone or iPad.
Step 2 Tap Apps, then select Music.
Step 3 Tap Downloaded Music to view all offline songs.
Step 4 Tap Edit, then remove all downloads at once or delete selected items as needed.
Option 2: iPhone Storage
Step 1 Open Settings on your iPhone or iPad, then tap General.
Step 2 Tap iPhone Storage and wait for the list to load.
Step 3 Scroll down and select Music.
Step 4 Tap Edit in the top right corner.
Step 5 Tap the red delete icon next to All Songs.
Step 6 Confirm removal to delete all downloaded music while keeping your library safe in your Apple ID.
Final Words:
To download all songs on Apple Music are not so difficult. If you want to download all Apple Music songs on your computer, just select all albums and start to download them directly. If you want to download all Apple Music songs on your phone, you will need to create a playlist with all songs first. Then you can download the playlists on your iPhone or Android device. Want to play Apple Music on multiple devices, ViWizard Apple Music Converter should be your best choice.
You May Be Interested


Adam Gorden, the digital media specialist at ViWizard, is dedicated to providing the best solutions for digital media management, including audio and video conversion, file optimization, and media workflow enhancements.
Leave a Comment (0)