
If you've been using iTunes for a long time, your music library often becomes a mix of different sources. It may include songs purchased from the iTunes Store, tracks ripped from CDs, and music added through an Apple Music subscription. While everything appears in one library, iTunes treats these files differently in the background.
This becomes clear when you try to back up your iTunes or Apple Music library or move it to another device, such as a new computer where MP3 is the most flexible format. You can create MP3 versions from iTunes purchases while keeping the original files in your library. Apple Music tracks, however, come from a streaming catalog and are protected by DRM, so they require special software like ViWizard Apple Music Converter to convert to MP3.
Once converted, the MP3 files can be added back to your library, transferred to other devices like MP3 players, or played on other media players. Try converting your iTunes or Apple Music library to MP3 now. If you're focused on Apple Music only, you can also check out our guide on how to convert Apple Music to MP3.
Keep Apple Music songs forever by saving them in formats like MP3 to play anywhere.
Part 1. Can You Convert an iTunes (Apple Music) Library to MP3?
Yes - You can convert DRM-free songs in your iTunes library (pre-Catalina Mac or Windows) or Apple Music library (Mac Catalina or later, Windows 11) directly to MP3 using the built-in encoder or VLC Media Player. This works for purchased iTunes tracks or music ripped from CDs.

First, check whether your songs are DRM-free. Look at the file kind in iTunes to see if they are local uploads, CD rips, iTunes purchases, or DRM-protected Apple Music streaming songs. Then select the DRM-free songs you want to convert and use the appropriate method.
| Method | Advantages | Disadvantages | Best For |
| ViWizard Apple Music Converter | Removes DRM, supports various formats | Requires another software | DRM-protected Apple Music content or multiple format needs |
| iTunes' MP3 Encoder | Built-in, easy to use | Limited formats, can't handle DRM | DRM-free iTunes tracks |
| VLC Media Player | Free, supports many formats | Can't handle DRM files | Simple tool for DRM-free music |
Usually, DRM-free songs need to be converted separately rather than converting your entire library at once. ViWizard Apple Music Converter is a great option if you want to convert everything at once, including a mixed library of Apple Music tracks, iCloud Music Library content, purchased songs, and CD rips, whether the content is DRM-protected or not.
Pro Tip: How to Tell Whether Your iTunes Library Is MP3, AAC, or Another Format
Before converting, it helps to know the format of your files. This prevents mistakes and ensures you use the right method for each part of your library.
Step 1 Open the iTunes (or Music) application on your computer.
Step 2 Locate the music file in your library.
Step 3 Right-click the file and select Song Info (or Get Info).
Step 4 In the dialog box, click the File tab and look at the Kind field. This tells you the format and source, such as:

| Format | Quality | DRM | Notes / Types | Best For |
|---|---|---|---|---|
| AAC (Advanced Audio Coding) | High (256 kbps) | May be DRM-protected |
– Apple Music AAC: from Apple Music downloads (DRM-Protected) – Purchased AAC: bought from iTunes Store (DRM-Free) – Matched AAC: your songs matched to cloud versions (DRM-Protected) – Protected AAC: older iTunes purchases (DRM-Protected) |
Apple Music, iTunes purchases |
| MP3 | Good | No | Standard, widely compatible | Any device, sharing, converting |
| Apple Lossless (ALAC) | Lossless | No | Similar to FLAC | Apple devices |
Part 2. How to Convert Apple Music Library to MP3 (DRM-Protected Songs)

Apple Music tracks cannot be converted directly to MP3 because they are DRM-protected. If your subscription ends, the songs are no longer accessible. For Apple Music subscribers, ViWizard Apple Music Converter can convert your iTunes or Apple Music library without limits. You can select songs, albums, or playlists in the built-in Apple Music Web Player, which gives access to both your library and the Apple Music catalog.
Using ViWizard Apple Music Converter:
For output formats, you can choose MP3, WAV, M4A (AAC), M4B, AIFF, or FLAC. MP3 works on almost any device, M4A is better for Apple devices, while WAV, AIFF, and FLAC keep higher audio quality. MP3 bitrates can go up to 320 Kbps. DRM is removed automatically, and conversion can run up to 30 times faster than real time.
For more control, go to Preferences > Output to adjust file names, folder structure, and save locations. ViWizard Apple Music Converter also keeps original metadata such as track name, artist, album, genre, and artwork, so your files stay organized after conversion.
Key Features of ViWizard Apple Music Converter
Free Trial Free Trial* Security verified. 5, 481,347 people have downloaded it.
- Convert Apple Music songs, albums, playlists, and artists into MP3 for easy access
- Preserve lossless audio, high-resolution lossless, and Dolby Atmos quality
- Strip DRM from Apple Music for unrestricted offline listening
- Save converted audio files while retaining full ID3 tag details
Step 1 Download and install ViWizard Apple Music Converter on your Windows PC or Mac, then open the program.
Step 2 Sign in with the Apple ID linked to your Apple Music library (this is required to access your songs and playlists).

Step 3 Browse your library inside ViWizard Apple Music Converter. When you find an album, playlist, or song to convert, click the + button to load all tracks for conversion.

Step 4 Go to Menu > Preferences > Conversion, set the output format to MP3, and adjust the bit rate if you want higher quality (256 kbps or 320 kbps works well).

Step 5 Click Convert to start converting your tracks. Wait while ViWizard removes DRM and saves the songs as MP3 files.

Step 6 When conversion finishes, open the output folder from within ViWizard. Your MP3s are ready to play or transfer, with all song details and album artwork preserved.

Many libraries today mix Apple Music tracks, purchased songs, CD rips, and sometimes music from other services. In that case, you can use ViWizard Streaming Music Converter to combine everything. This tool supports Apple Music, Spotify, Tidal, Amazon Music, YouTube Music, and more. It works like ViWizard Apple Music Converter: access Web Players, select tracks, and convert them to MP3. You don't need this step if you're not managing your music through iTunes.
A versatile all-in-one streaming music recorder to extract songs, albums, playlists, and exclusive content from Spotify, Apple Music, Amazon Music, Tidal, Deezer, Pandora, SoundCloud, Qobuz and LINE MUSIC into popular formats like MP3 - with support for original sound quality, fast batch conversion, and built-in music management to help you save, organize, and enjoy your favorite tracks anytime, anywhere.
Part 3. How to Convert iTunes Library Playlists to MP3 (DRM-Protected Songs)
For users who download M4P files from iTunes or mainly use iTunes songs instead of Apple Music, you still need a converter that works directly with local files rather than streaming content.
Using Wondershare UniConverter:
Wondershare UniConverter is a media converter that supports many audio and video formats and allows fast batch conversion. You can import your iTunes playlists and convert them into MP3 files in one process. It also supports transferring converted files to devices like iOS and Android, making it easier to move your music library across different devices.
To convert iTunes files and songs to MP3, open Wondershare UniConverter and go to the Converter section to add your iTunes files. Then select Output Format > Audio > MP3 and start the conversion. Once finished, you can use the transfer option to move the MP3 files to other devices easily.
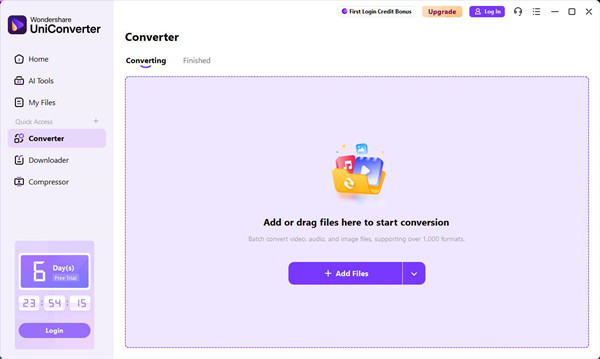
Step 1 Download and install Wondershare UniConverter on your Windows PC or Mac, then open the program.
Step 2 Open the Converter section from the main interface.
Step 3 Click the add file or document icon to import your iTunes songs or playlists that you want to convert to MP3.
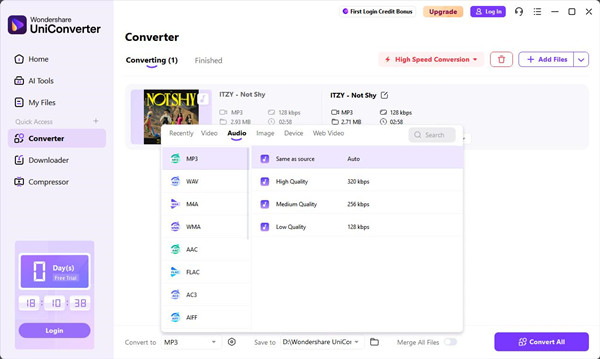
Step 4 Go to Convert to, choose the Audio tab, and select MP3 as the output format. Then choose your preferred quality settings.
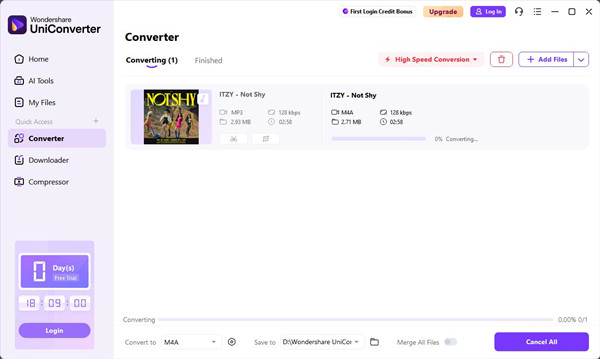
Step 5 Click Convert to start converting your iTunes files to MP3. Wait while the software processes your tracks.
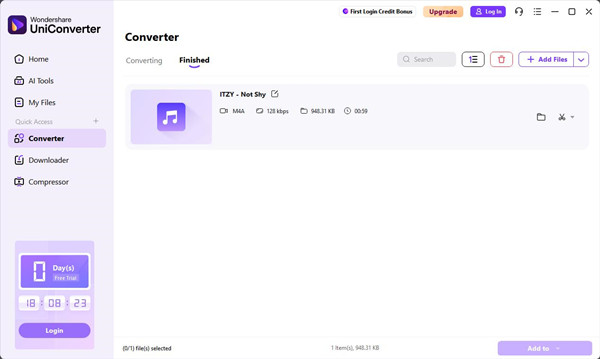
Step 6 When conversion is finished, open the Finished tab to find your MP3 files. You can also use the transfer option to move them to iPhone, iPad, or Android devices.
Part 4. How to Convert iTunes Library Purchases or Ripped Music to MP3 (DRM-Free Songs)
Songs purchased from the iTunes Store or ripped from a CD are the easiest to convert because they are not protected by DRM. iTunes includes a built-in converter that supports AAC, MP3, AIFF, Apple Lossless, and WAV formats.
Using iTunes' Encoder:
To convert your library using iTunes, first consolidate your files by going to File > Library > Organize Library > Consolidate Files. Then hold the Option key when opening the Music app and select Choose Library, pointing to your old iTunes folder. Next, check Song Info (or Get Info) > File > Kind. If it shows "Purchased AAC" or "MPEG audio file," you can convert it directly. For "Apple Music AAC" files, ViWizard Apple Music Converter can help save time and avoid conversion issues.
Step 1 Open iTunes on your computer and make sure your library is visible.
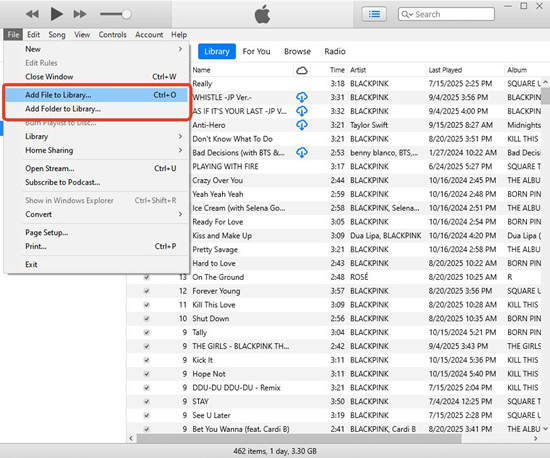
Step 2 Either purchase songs from the iTunes Store, import an supported CD, or add local files using File > Add File to Library or Add Folder to Library.
Step 3 Open Preferences (Edit > Preferences on Windows, iTunes > Preferences on Mac) and go to the General tab.

Step 4 Click the Import Settings… button, set Import Using to MP3 Encoder, and click OK to confirm.

Step 5 Close Preferences, then select the songs in your library that you want to convert.
Step 6 From the menu, go to File > Convert > Create MP3 Version. The new MP3 files will appear next to your original tracks and are ready to play anywhere or transfer.

Part 5. How to Convert Non-Apple Music Files in Your iTunes Library to MP3 (Local Files)

Some songs in your iTunes library may come from outside sources, such as downloads, recordings, or files imported from other platforms. These are called local files and are often already in formats like MP3, AAC, WAV, or AIFF.
Using Audacity:
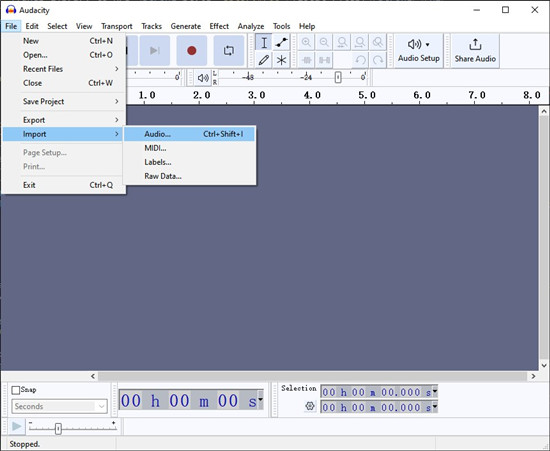
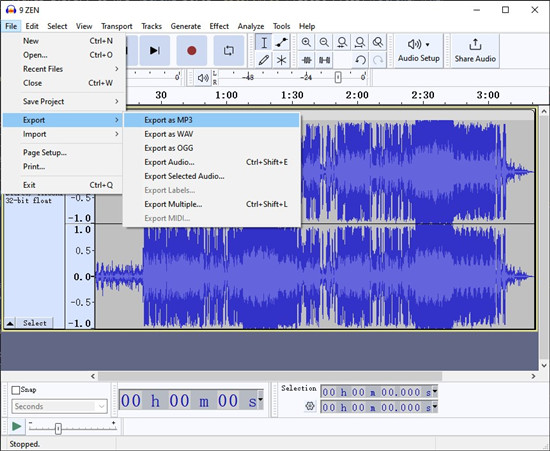
For non-Apple Music files, Audacity can help. First, open Audacity and import the audio file by dragging it into the program or using File > Import > Audio. Once the file is loaded, you can make small edits if needed, such as trimming or adjusting volume. To convert the file to MP3, go to File > Export > Export as MP3, then save the file.
Step 1 Open Audacity on your computer.
Step 2 Import your audio file by dragging it into the program or using File > Import > Audio.
Step 3 Once the file is loaded, check it and make simple edits if needed, such as trimming or adjusting volume.
Step 4 Go to File > Export > Export as MP3.
Step 5 Choose your preferred quality settings and confirm the export.
Step 6 Save the MP3 file to your computer. You can then add it back to your iTunes or Apple Music library for playback and syncing.
Part 6. How to Add Converted MP3 Files Back to Your iTunes (Apple Music) Library
After conversion, add MP3s back to iTunes. Check album art, metadata, and remove duplicates to keep your library tidy and playlists functional. If you want to stick to local MP3s while using iTunes or Music, turn off Sync Library to prevent iCloud uploads.
Step 1 Open iTunes on your Windows PC, or open the Music app on a Mac.
Step 2 Drag your converted MP3 files directly into the iTunes or Music library window (or go to File > Add to Library and browse to select them).
Step 3 Once imported, check the Recently Added section to make sure your songs appear.
Step 4 If you want, right-click a song and choose Get Info to review or update the track details (like title, artist, or album).
Step 5 To replace the original DRM-protected version: find the original song in your library, right-click it, and select Delete from Library, then confirm.
Step 6 Double-check that the new MP3 version is correctly added and organized in your library.
Part 7. How to Transfer Your iTunes (Apple Music) Library as MP3 to Any Device
Once in MP3 format, your music works on nearly any device, including phones, tablets, MP3 players, USB drives, or cloud storage. I back up to both USB and cloud for safety. For very large libraries, keep an eye on file sizes and storage, but MP3 is about as flexible as it gets.
Transferring Converted iTunes (Apple Music) Library to iPhone, iPad, or iPod Touch
Option 1: Sync Manually Without Subscription
Step 1 Connect your Apple device to your computer using a USB cable.
Step 2 Open iTunes and click the device icon at the top-left corner.
Step 3 Go to Music > Sync Music, then choose either specific playlists, artists, or your entire library.
Step 4 Click Apply to start syncing. Your MP3s will now appear on your device.
Option 2: Use "Sync Library" with Apple Music Subscription
Step 1 On Mac, go to Music > Settings > General and check Sync Library; on Windows, go to Edit > Preferences > General and check iCloud Music Library.
Step 2 Sign in with the same Apple ID on all your devices.
Step 3 Your MP3s will automatically upload and be available in the Apple Music app.
Transferring Converted iTunes (Apple Music) Library to Android Devices
Step 1 Connect your Android phone or tablet to your computer with a USB cable.
Step 2 On the device, select File Transfer mode.
Step 3 Open the Android storage on your computer and locate the Music folder.
Step 4 Drag your MP3 files into the Music folder.
Step 5 Safely eject your device. The MP3s are now available in your music player app.
Transferring Converted iTunes (Apple Music) Library to MP3 Player
Step 1 Connect your MP3 player to your computer via USB and wait for it to appear in File Explorer (Windows) or Finder (Mac).
Step 2 Open your iTunes MP3 folder and locate the tracks you want to transfer.
Step 3 Select the desired MP3 files and drag them to the MP3 player folder.
Step 4 Safely eject your MP3 player from the computer once the transfer is complete.
Step 5 Disconnect the device and check that your songs appear correctly in the MP3 player's library.
Step 6 Organize the tracks into playlists on the MP3 player if the device supports it.
Transferring Converted iTunes (Apple Music) Library to USB
Step 1 Insert a USB flash drive into your computer and wait for it to appear in File Explorer (Windows) or Finder (Mac).
Step 2 Open the iTunes MP3 folder and choose the songs or albums you want to copy.
Step 3 Drag the selected files to the USB drive folder and wait for the transfer to complete.
Step 4 Safely eject the USB drive from your computer.
Step 5 Plug the USB drive into another device to confirm the MP3 files are accessible.
Part 8. How to Play Your Apple Music Library as MP3 Without the Apple Music App
MP3s play smoothly on Windows Media Player, VLC, and most apps supporting standard audio formats. They make switching between devices or platforms easy without worrying about compatibility.
Using Windows Media Player
Windows Media Player is built into Windows and plays MP3 files easily. Simply add your converted MP3 folder to the library, browse your songs, and click Play. It's simple and quick, though playlists from iTunes need to be recreated manually.
Step 1 Open Windows Media Player and go to the Library view.
Step 2 Click Organize in the top menu, then select Manage Libraries > Music to ensure your iTunes library folder is included.
Step 3 Browse your iTunes library within Windows Media Player and locate the MP3 files you want to play.
Step 4 Double-click a song to play it, or select multiple tracks and click Play to create a temporary playlist.
Step 5 To save a playlist, click Create Playlist at the bottom, name it, and drag your selected tracks into it.
Step 6 Adjust playback settings such as shuffle, repeat, or crossfade from the Now Playing menu as needed.
Using VLC Media Player
VLC is a free, cross-platform media player that also plays MP3 files. Open a folder or file to play music, or use the Playlist view to organize tracks. It's flexible and lightweight, but it doesn't automatically preserve iTunes playlists, so you'll need to set them up manually.
Step 1 Open VLC Media Player and go to Media > Open Folder... to locate your iTunes MP3 folder.
Step 2 Select the folder and click Select Folder (Windows) or Open (Mac) to import the tracks into VLC.
Step 3 Click Play to start listening to your songs immediately, or use the playlist panel to reorder tracks.
Step 4 To save the playlist, go to Media > Save Playlist to File... and choose M3U or XSPF format.
Step 5 Use VLC's playback options to adjust equalizer, loop, or randomize tracks if desired.
Summary:
For the two methods to convert iTunes library to MP3, which one do you prefer? If your songs are not protected, you can use iTunes, Apple Music, or ViWizard Audio Converter to export songs from iTunes library to MP3. If your songs are protected, like iTunes songs bought before 2009 or Apple Music songs, you need to use ViWizard to convert iTunes library to MP3.
You May Be Interested


Adam Gorden, the digital media specialist at ViWizard, is dedicated to providing the best solutions for digital media management, including audio and video conversion, file optimization, and media workflow enhancements.
Leave a Comment (0)