
Apple Music is usually simple to use. You open the app, pick a song, and let it play while doing something else. This could be during a workout, studying, a commute, or time with friends. Sometimes the next song does not fit the moment, and it feels annoying when you are not sure how to adjust the queue instead of just skipping to the next track.
The queue, also called "Up Next," lets users control upcoming songs without stopping the music. You can add, reorder, remove songs, or even clear the queue entirely. It gives more control than relying only on playlists or AutoPlay.
This feature works on iPhone, Android, Mac, and Windows. The layout may differ, but the function stays the same. Once you know where to look, the queue becomes one of the most useful tips for using Apple Music.
Part 1. How Apple Music Queue Works (Play Next vs Play Later vs Play Last)
By default, Apple Music plays music using a single system called Up Next, where your current song, the rest of the album or playlist, and any queued tracks are managed in one list. If you want more control over what plays next, tap the mini-player and open Up Next to adjust the queue manually.
In practice, Apple Music always follows this structure: current song first, then Play Next items, followed by Play Last items, then the original album or playlist order (or shuffle version), and finally AutoPlay when enabled.
-

Play Next
Apple Music's "Play Next" inserts a song immediately after what is currently playing and overrides the next position in the queue. If you keep adding tracks with Play Next, they stack at the front of the queue and determine the immediate listening order.
-
Play Last or Play Later or Play After
Apple Music's "Play Last" (or Play Later / Play After depending on the device) sends songs to the end of the Up Next list. These tracks only play after everything already in the queue has finished.
-
Shuffle
Apple Music Shuffle changes the order of the current album or playlist only for that session. It does not permanently modify the original order and still follows a continuous path, just in a randomized sequence.
-
AutoPlay
Apple Music AutoPlay extends playback after the queue ends by automatically adding similar songs based on what you are listening to. It only activates once the Up Next list is fully finished and can be turned on or off from the queue screen.
Part 2. How to Open and View the Apple Music Queue
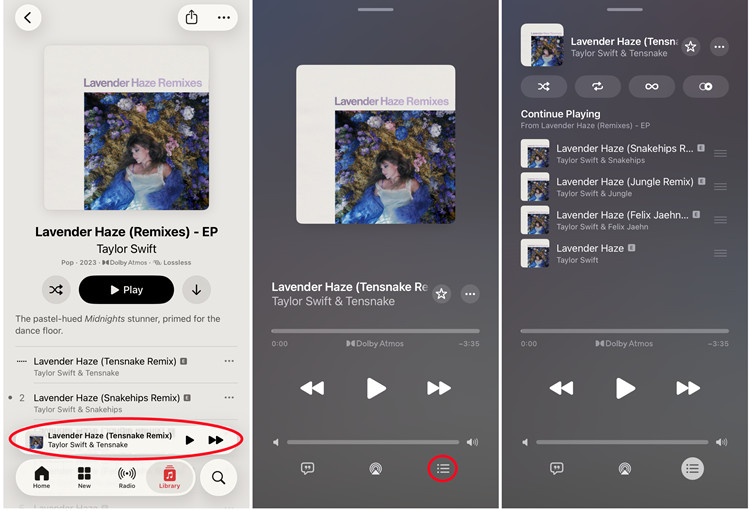
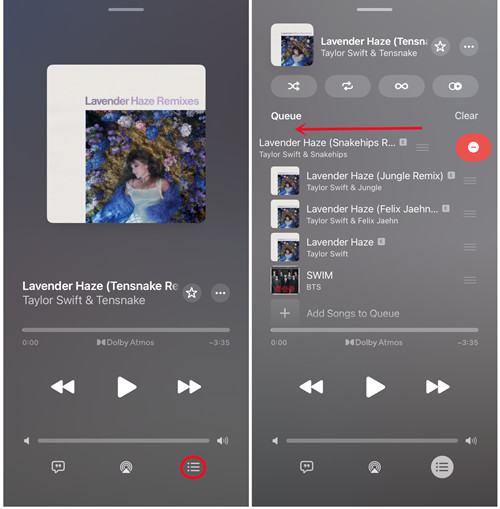
In Apple Music, the queue is managed through the Up Next (iTunes) or Continue Playing (Music app) list. If nothing is playing, try playing a song to generate a queue. Tap the Now Playing bar at the bottom of the screen. Then tap the Up Next icon (hamburger symbol) to open the queue view. Here you will see the current song at the top, followed by the Continue Playing or Up Next list in order. If AutoPlay is on, you will also see a separate section at the bottom with suggested songs. This screen shows what will play next.
For Windows or Mac:
01Open iTunes on Windows or open the Music app on Mac, then start playing any song, album, or playlist.
02Click the Up Next button in the playback area (three horizontal lines).

03The queue opens immediately. It appears as a small Up Next dropdown near the top playback controls.
04View the current song, upcoming tracks, and queued items.
05Scroll down to see AutoPlay suggestions if it is turned on.
06Click the Up Next button again to close the queue.
For iOS or Android:
01Open the Apple Music app on your mobile device.
02Start playing any song.
03Tap the Now Playing bar at the bottom.
04Tap the Playing Next button (three lines) in the lower-right corner.
05The queue opens and shows upcoming songs.
06Scroll to view AutoPlay suggestions if available.
07To exit the queue, tap anywhere else or tap the Up Next icon again to return to Now Playing.
Part 3. How to Add Songs to Apple Music Queue
3.1 Manually Add Songs
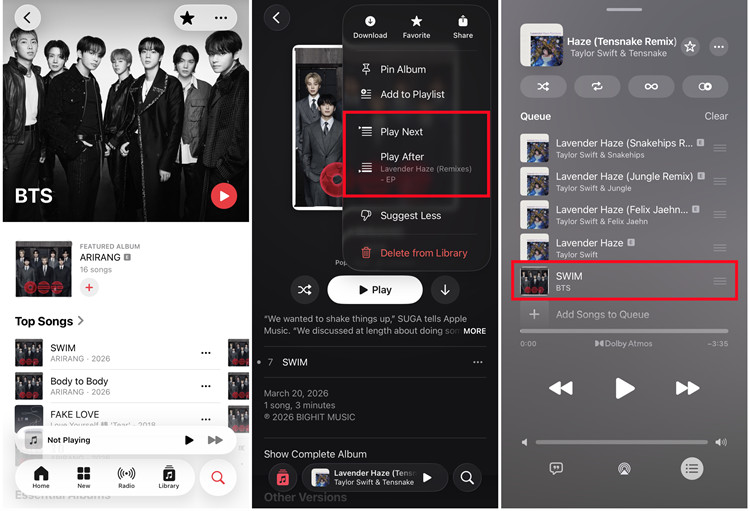
To add a track, find any song in a playlist, album, or search results. Then tap and hold it on mobile or right-click it on desktop. Tap Play Next to put the song at the top of the queue so it plays right after the current track, or tap Play Later to add it to the end of the queue so it plays later. You can repeat this from anywhere in the app to build your listening order.
For Windows or Mac:
01Open iTunes on Windows or open the Music app on Mac.
02Find a song, album, or playlist.
03Right-click the item.
04Click Play Next to place it after the current song, or click Play Later to add it to the end of the queue.

05Open the Up Next view to confirm the song is added.
For iOS or Android:
01Open the Apple Music app on your device.
02Find the song you want.
03Tap the More button (···) next to the song.
04Tap Play Next or Play Later.
05Open Now Playing → Up Next.
06The song appears in the queue.
3.2 Use AutoPlay to Automatically Add Suggested Songs
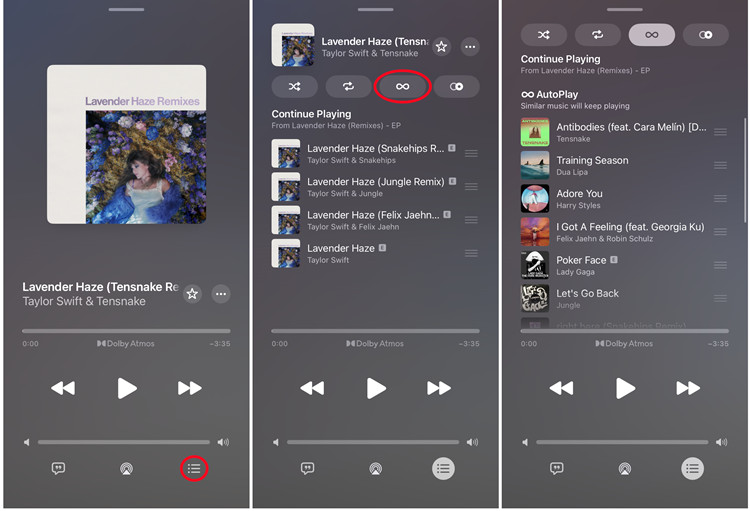
Apple Music can also add songs automatically using AutoPlay. Play a song, then open the Now Playing screen. Tap the Up Next icon (hamburger symbol) to open the queue, and tap the AutoPlay icon (infinity symbol) at the top to turn it on. This lets Apple Music add similar songs after the queue ends. Scroll down to see the "AutoPlay" section. You can also manage this list and remove songs if needed. Turn AutoPlay off to stop suggestions and keep only your selected tracks.
For Mac Only:
01Open the Up Next view.
02Click the AutoPlay (∞) button at the top right to turn it on or off. When enabled, Apple Music adds similar songs after the queue ends.
For iOS or Android:
01Tap the Now Playing bar.
02Open the Up Next queue.
03Tap the AutoPlay (∞) icon to toggle it.
04Suggested songs are added after the queue finishes.
Part 4. How to Reorder Songs in Apple Music Queue
4.1 Manually Change the Order of Songs
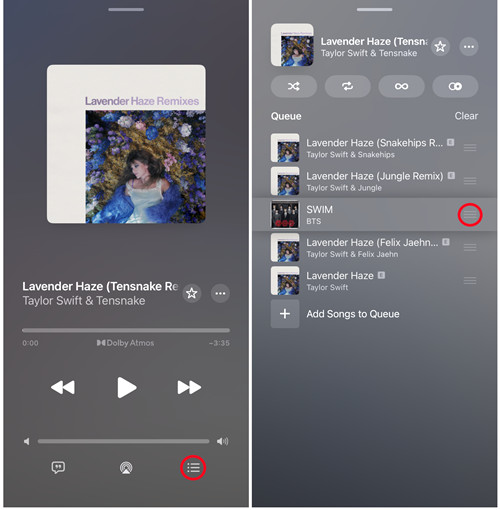
You can change the order of songs in the Up Next queue at any time. Open the queue from Now Playing. Each song shows a drag handle on the right side. Press and hold it, then move the song up or down in the list. The order updates right away.
For Windows or Mac:
01Click the Up Next icon.
02Find the song you want to move.
03Click and hold the song in the queue list.
04Drag it up or down to the desired position.
05Release to save the new order.
For iOS or Android:
01Open Apple Music and play any song.
02Tap the Now Playing bar.
03Open the Up Next queue.
04Press and hold the drag handle next to a song.
05Move the song up or down in the list.
06Let it go and check the new order.
4.2 Use Shuffle to Automatically Change the Order
You can also shuffle the queue to change the order automatically. Open the Up Next queue, then turn on the Shuffle option if available on your device. Apple Music will mix the order of the upcoming songs. This is useful when you want a more random listening flow without adjusting each song manually.
For Windows or Mac:
01Start playing a song or queue in Apple Music.
02Open the Up Next panel.
03Click the Shuffle icon (crossed arrows). The queue order is randomized automatically.
04Click Shuffle again to turn it off.
For iOS or Android:
01Start playback in Apple Music.
02Tap the Now Playing screen.
03Tap the Shuffle button in playback controls.
04The queue order is immediately randomized.
05Tap Shuffle again to disable it.
Part 5. How to Remove Songs from the Apple Music Queue
To remove a song, open the Up Next queue from Now Playing. Find the song you want to remove and swipe left on mobile or click the "Remove" option on desktop. The song is removed instantly, and the rest of the queue moves forward automatically.
For Windows or Mac:
01Click the Up Next icon to open the queue.
02On Windows, hover over the song and click the remove icon (×). On Mac, control-click the song and select Remove.
03The song is removed immediately from the queue.
For iOS or Android:
01Open Apple Music and start playback.
02Tap the Now Playing bar.
03Open the Up Next queue.
04Swipe left on the song you want to remove.
05Tap Remove or the minus icon.
06The song disappears from the queue instantly.
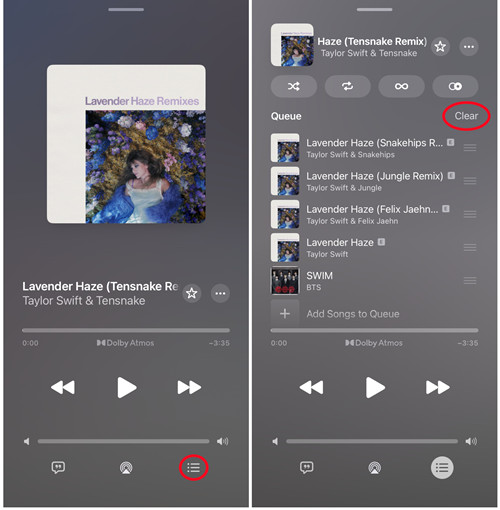
Part 6. How to Clear the Entire Apple Music Queue
If you want to start over, open Now Playing and go to the Up Next queue. Look for the Clear or Clear All option at the top or in the queue menu, depending on your device. Tap it to remove all added songs at once. If AutoPlay is still on, Apple Music may keep adding songs, so you may need to turn it off to fully reset the queue.
For Windows or Mac:
01Open Apple Music and start playing any song.
02Click the Up Next icon to open the queue.
03On Windows, scroll to the bottom of the queue to find the Clear option. On Mac, find the Clear option at the top or in the menu.
04Click it to remove all upcoming songs.
05Confirm the action if prompted.
06The queue is cleared immediately.
For iOS or Android:
01Open Apple Music and start playback.
02Tap the Now Playing bar.
03Open the Up Next queue.
04Scroll to the top of the queue.
05Tap Clear or Clear All.
06Confirm to remove all queued songs.
Bonus. How to Convert Apple Music Songs to MP3
If you want more flexibility with your music, a tool like ViWizard Apple Music Converter can be useful. It lets you convert Apple Music songs, playlists, and albums into MP3 files, so you are not limited to the Apple Music app for subscription-based streaming. This is helpful if you want to keep songs for offline listening anytime, anywhere, even on devices that do not support Apple Music directly. You can save music locally and play it on almost any device that supports MP3 files.
The process is simple. You install the software on your computer, sign in to your Apple Music account inside the tool, and select the songs or playlists you want. Then you start the conversion. After it finishes, your music is saved as MP3 files on your device, ready to use offline.
Keep Apple Music songs forever by saving them in formats like MP3 to play anywhere.
You May Be Interested


Adam Gorden, the digital media specialist at ViWizard, is dedicated to providing the best solutions for digital media management, including audio and video conversion, file optimization, and media workflow enhancements.
Leave a Comment (0)