


I know most Apple Music users can tell when a song sounds good, but it is not always obvious what you can actually do with the file itself. Everything works fine inside the app, but once you want to use Apple Music tracks for editing or music production, the limits start to show. Apple Music uses AAC for standard audio, while some tracks are also available in ALAC lossless. Both work well for listening, but neither is WAV, an uncompressed lossless format often used for editing and production.
So naturally, the question comes up: can Apple Music be converted to WAV? Yes, but not directly in Apple Music. This is where tools like ViWizard Apple Music Converter can help, allowing you to convert Apple Music content to WAV files for local use.
In this guide, we will look at whether Apple Music can be converted to WAV, how to convert it with a desktop converter or recording software, what happens during the conversion, and what you can do with the converted WAV files afterward.

Need Apple Music in more flexible audio formats? ViWizard Apple Music Converter helps Apple Music subscribers create a personal music library with seamless music backup. Build your collection and keep your music beyond the Apple Music app.
Part 1. Can You Convert Apple Music to WAV?
Yes, but it depends on whether the song is eligible.
Can You Convert Apple Music to WAV?
Apple supports converting eligible songs to WAV in the Music app on Mac or iTunes on Windows PC. The song must be available as a file the app can convert, either in your library or imported from a folder or disk. This differs from downloading Apple Music subscription content for offline listening, which stays in the Apple Music app rather than becoming standalone WAV files.
Can You Convert M4P to WAV?
M4P files from the Apple Music catalog may include DRM protection, making them difficult to use outside Apple's system. As a result, some converters cannot convert them to WAV. ViWizard Apple Music Converter is designed to convert Apple Music tracks to WAV.
Apple also limits reproduction, and some older iTunes Store purchases using Protected AAC cannot be converted. Apple's built-in method applies to eligible music files, while desktop converters and audio recording software offer alternatives when a local WAV file is needed.
Part 2. How to Convert Apple Music to WAV with a Desktop Converter
A desktop Apple Music converter such as ViWizard Apple Music Converter requires installation on a supported computer. It uses a built-in Apple Music Web Player, where users sign in to connect their music library. Songs, albums, or playlists can then be selected for conversion. Choose WAV as the output format and adjust settings such as bit rate, sample rate, and audio channels before starting. ViWizard also supports batch conversion and preserves metadata such as song information and lyrics. Other available formats include MP3, M4A, M4B, AIFF, and FLAC.
The main difference from the Apple Music app or iTunes is that the converter processes the selected Apple Music content into local audio files rather than using Apple's built-in conversion function for eligible songs. Exact access requirements, supported platforms, account requirements, and available features vary by converter, so these should be treated as third-party capabilities rather than official Apple Music functions.
Key Features of ViWizard Apple Music Converter
Free Trial Free Trial* Security verified. 5, 481,347 people have downloaded it.
- Convert Apple Music songs, playlists, albums, and artists
- Export Apple Music in 6 formats for different devices and players
- Preserve metadata and lyrics when creating music collections
- Organize converted music by artist and album
- Batch download large Apple Music collections
 Step 1: Download and Install ViWizard Apple Music Converter
Start by visiting the ViWizard website and downloading the Apple Music Converter for Windows or Mac. Once installed, open the app and sign in with your Apple Music account to access your full library, including playlists, albums, and tracks.
 Step 2: Choose WAV as Your Output Format
Click the settings icon in the top-right corner to open preferences. Select WAV as the output format and adjust sample rate, bit rate, and audio channels if needed. Once done, click OK to save your settings.
 Step 3: Add Songs to the Conversion Queue
Browse your Apple Music library and select songs, albums, or playlists you want to convert. Click the "+" button to add them to the conversion list. Then click Convert to start processing. ViWizard will convert your music into WAV format in a few minutes.
 Step 4: Access Your Converted WAV Files
Once conversion is complete, click the History tab to view your files. Open the output folder using the folder icon to locate your WAV files. You can now transfer them to any device or media player for offline use.
Part 3. How to Convert Apple Music to WAV with Audio Recording Software
Audio recording software takes a different approach by capturing Apple Music as it plays. With Audacity, users can select a system-audio or loopback source, start recording, play the desired content in the Apple Music app, iTunes, or the Apple Music Web Player, and stop the recording when finished. The recording can then be trimmed or edited and exported through File > Export > Export as WAV. Audacity also provides WAV settings such as sample rate, channels, and PCM encoding.
The recording creates a new WAV file without changing the original Apple Music content. Since the audio is captured in real time, playback must continue during the recording. The available recording sources and setup steps also vary by operating system and software.
01Download and install Audacity.
02Install VB-Audio Cable (Windows) or Soundflower (Mac).
03Set system Sound Output to VB-Audio Cable or Soundflower.
04Open Audacity and set Recording Device to the same virtual audio device.
05Open Apple Music.
06Click Record in Audacity and play the music.
07Click Stop when finished.
08Go to File > Export > Export as WAV.
Part 4. How to Convert Apple Music to WAV with Apple Music App or iTunes
Apple provides a built-in conversion function in the Music app on Mac or iTunes on Windows. Set WAV under Music > Settings > Files > Import Settings, select the songs, then choose File > Convert > Create WAV Version. Apple creates a new WAV version while keeping the original unchanged. Since WAV is uncompressed, the new file can be much larger, but converting a compressed song does not improve its quality or restore lost audio data.
This is not a general Apple Music subscription-to-WAV converter. Apple documents subscription downloads for offline listening, but not exporting them as standalone WAV files. Apple Music also offers lossless ALAC up to 24-bit/192 kHz. Converting a lossless source to WAV preserves the same source information without adding audio detail. Some content has conversion restrictions, including older iTunes Store purchases using Protected AAC. For content that cannot be converted within the app, consider a desktop converter or audio recording software.
01Open iTunes on your computer. If you do not have it installed, download it from Apple's official website.
02Add your unprotected songs to iTunes using File > Add File to Library or Add Folder to Library.
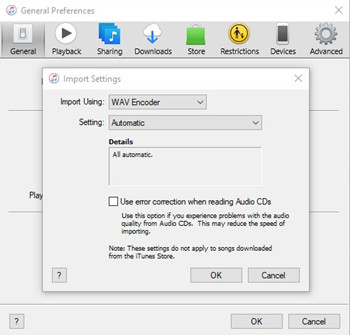
03Go to Preferences (Mac: iTunes > Preferences, Windows: Edit > Preferences), then open Import Settings under the General tab.
04Select WAV Encoder from the Import Using dropdown and click OK to save the settings.
05Select the songs you want to convert in your library.
06Right-click the selected songs and choose Create WAV Version to start the conversion.
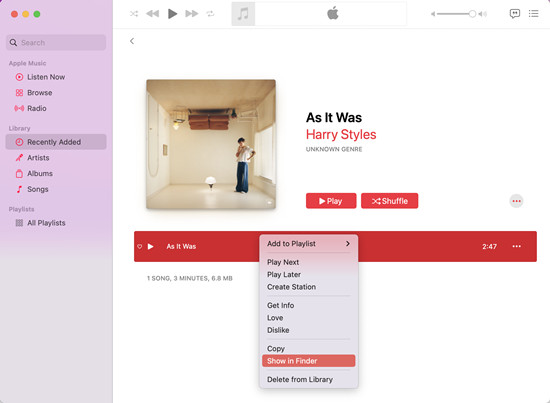
07Find the converted WAV files by right-clicking a track and selecting Show in Finder or Show in Windows Explorer.
Part 5. What Happens When You Convert Apple Music to WAV?
| Feature | Apple Music App or iTunes | Music Converter | Audio Recording Software |
|---|---|---|---|
| Source | Eligible local music files in the library | Supported Apple Music songs, albums, or playlists | Apple Music audio played on the computer |
| How it works | Converts an eligible song into a new WAV version | Converts selected Apple Music content into local WAV files | Records Apple Music audio as it plays and saves it as WAV |
| Apple Music downloads | Not a general way to export subscription downloads as WAV | Can process supported Apple Music content | Captures the audio during playback |
| Speed | Faster than real-time | Usually faster than real-time | Real-time, so playback must continue |
| Batch conversion | Yes, for eligible songs | Usually supported | Less convenient because recording is done in real time |
| Output settings | Basic WAV conversion options | Usually more options for audio settings | Depends on the recording software |
| Metadata | Keeps the song in the Music library with its information | Can preserve metadata, depending on the software | May need to be added or edited afterward |
| Original file | Kept unchanged | Kept unchanged | Kept unchanged |
| Main limitation | Only works with eligible files | Requires third-party software and supported content | Requires a suitable recording setup |
| Best for | Converting eligible files already in your library | Converting supported Apple Music content to local WAV files | Recording Apple Music when direct conversion is not available |
The three methods serve different needs. Apple Music or iTunes is suitable for converting eligible music files already in your library, while a music converter provides a way to process supported Apple Music content into local WAV files with additional conversion options. Audio recording software takes a different approach by capturing the audio during playback, making it useful when direct file conversion is not available. In all three cases, the resulting WAV file does not gain additional audio information beyond the original source.
Part 6. What Can You Do with Apple Music WAV Files?
After conversion or recording, the local WAV file can be added back to the Apple Music app or iTunes, edited in Logic Pro, burned to a CD, or transferred to a supported device. You can also keep the original WAV file unchanged while creating edited or exported versions as needed.
Keep in mind that the reproduced WAV file may be used only for personal, noncommercial purposes.
1. Import WAV Files into the Apple Music App or iTunes
Apple Music and iTunes support WAV files, so you can add them directly to your library. Open Apple Music or iTunes, then choose File > Add File to Library or Add Folder to Library and select your WAV files. The tracks appear in the Music section like regular songs, where you can play and organize them. Right-click a track and open Song Info to edit details such as the title, artist, and album. If syncing is enabled, the files can also be synced to other Apple devices. The original WAV file remains unchanged.
2. Edit WAV Files in Logic Pro
Logic Pro supports WAV files for editing and music production. Open a new project with File > New Project, then drag the WAV file into the timeline to create an audio track. You can cut, trim, and arrange the audio in the workspace. Open Window > Show Mixer to adjust volume, add effects, and control layers, then export the finished file. Audio Track Editor edits are non-destructive; some Audio File Editor edits change the source file directly, so work with a copy of the WAV when needed. You can also export a selected region as a new WAV file.
3. Burn WAV Files to a CD
Both Apple Music and iTunes support WAV files for CD burning. Create a playlist with File > New > Playlist, then drag the WAV files into it. Right-click the playlist and choose Burn Playlist to Disc. Select Audio CD, insert a blank disc, and click Burn. The resulting disc can play on standard CD players and compatible car systems. Apple Music downloads cannot be burned to a CD, so the files must be eligible local audio files.
4. Transfer WAV Files to Apple Devices
After adding WAV files to your music library, you can sync them to an iPhone, iPad, or iPod. On Mac, connect the device, open it in Finder, select the music syncing options, and sync the selected music from the Music app. You can also use the Files tab in Finder to transfer individual files to apps that support file sharing. This keeps WAV files on the device as local files instead of relying on Apple Music subscription downloads. The exact steps depend on whether you sync the WAV as music or transfer it to a compatible app, and available storage limits how many files you can keep.
Part 7. Conclusion
Converting Apple Music to WAV gives you a local, uncompressed audio file, but the right method depends on the source and how you plan to use it. For eligible files already in your library, use the Music app or iTunes. For supported Apple Music content that you want to save as local WAV files, a music converter such as ViWizard Apple Music Converter can provide a more practical workflow. When direct conversion is not available, audio recording software can capture the audio as it plays.
Converting a compressed source to WAV does not restore lost audio data, while converting a lossless Apple Music source preserves its existing audio information in an uncompressed format. Once you have the WAV file, you can add it to your music library, edit it in Logic Pro, burn it to a CD, or transfer it to a supported device.
So, choose the method based on what you need to do with the music. Apple Music works well for listening and offline playback within its ecosystem, while local WAV files give you more flexibility for editing and working with compatible music tools. Keep reproduced files for personal, noncommercial use.
Can You Convert Apple Music to WAV?
Yes, but it depends on the content. Apple Music downloads aren't ordinary WAV files that you can open or convert like local audio. To save them as WAV files, you'll generally need a dedicated Apple Music converter or another supported method.
Can You Convert Apple Music to WAV Directly in Apple Music or iTunes?
Not for protected Apple Music content. Apple Music and iTunes can convert some local or unprotected audio files, but they can't bypass DRM protection. Protected files may show a message saying they cannot be converted.
Why Can't I Convert My M4P File to WAV?
Some M4P files are protected AAC audio, especially in older iTunes libraries. Protected M4P files can't be converted to WAV using the normal Apple Music or iTunes conversion function. Some Apple Community users have reported seeing a "protected files cannot be converted to other formats" message.
Does Converting Apple Music to WAV Improve Sound Quality?
No. Converting a song to WAV doesn't restore lost audio information or make the original recording higher quality. WAV is uncompressed, so it can still be useful for audio editing and music production.
Should I Convert Apple Music to WAV or ALAC?
It depends on how you plan to use the files. WAV is uncompressed and widely supported for audio editing and production. ALAC is Apple's lossless format, which keeps the original audio while using less storage. It's also more convenient for metadata and album artwork.
Can I Import WAV Files into Apple Music?
Yes. You can add local WAV files to an Apple Music library and add them to playlists. You can also access them on an iPhone. This is different from downloading Apple Music subscription content, which remains managed by Apple.
You May Be Interested


Dave Henry, a multimedia technologist at ViWizard, focuses on delivering the best solutions for digital media challenges, including audio and video conversion, media optimization, and troubleshooting.

Leave a Comment (0)