


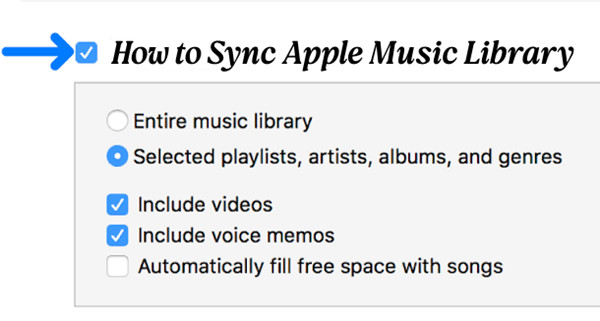
Keeping an Apple Music library in sync used to mean connecting devices and moving music manually. With Sync Library, it is much easier. Once enabled, your songs, albums, playlists, and other library content can stay up to date across supported devices, so you can access your music wherever you are.
However, Sync Library is not the same as transferring music between devices. It works within the Apple Music ecosystem and requires compatible devices and an active Apple Music subscription or iTunes Match. This raises a few practical questions, such as how Sync Library works, how to turn it on or off, and what happens when the service is no longer active.
In this guide, we'll explain how to use Sync Library on the web, iPhone, iPad, Mac, and Windows PC, what happens when you turn it on or off, and how to transfer Apple Music songs as regular audio files.
Part 1. What Is Sync Library in Apple Music?
Sync Library is Apple's current feature for making your music library available across supported devices through iCloud. Apple Music subscribers can access their library on iPhone, iPad, Mac, Windows PC, and the web when signed in with the same Apple Account. Apple calls this feature iCloud Music Library in iTunes for Windows.
Part 2. How Does Apple Music Sync Library Work?
When you turn on Sync Library on your Mac, PC, iPhone, or iPad, Apple Music uses iCloud to keep your music library updated across devices. Changes to your library can appear on other devices signed in with the same Apple Account, and you can stream your library from the Apple Music app or at music.apple.com. In the Apple Music app, turn on Sync Library under Settings > General; in iTunes for Windows, turn on iCloud Music Library under Edit > Preferences > General.
Part 3. How to Access Your Synced Apple Music Library on the Web
Apple Music on the web lets you access your synced library without installing the Music app. Go to music.apple.com, select Sign In, and use the same Apple Account associated with your Apple Music subscription and Sync Library. Once signed in, select Library in the left sidebar to browse Songs, Albums, Artists, Playlists, and other categories. Select an item and click Play to start playback. You can also use Search to find a song, artist, album, or other keyword. Select Your Library instead of Apple Music to search only your library.
01Go to music.apple.com.
02Click Sign In and log in with the Apple Account used for your Apple Music subscription and Sync Library.
03Click Library in the left sidebar.
04Click Songs, Albums, Artists, Playlists, or another available category to browse your synced library.
05Select a song or album and click Play to start listening.
06To search your library, click Search, enter a song, artist, or album, then select Your Library instead of Apple Music.
07If some library categories are hidden, move the pointer over Library, click Edit, select the sections you want to show, and click Done.
Part 4. How to Sync Your Apple Music Library on iPhone and iPad
On iPhone or iPad, Sync Library is controlled through the Settings app. To check your Apple Account, open Apple Music, tap your profile photo or account icon, and select Account Settings. Then go to Settings > Apps > Music and turn on Sync Library.
Your library will sync with other supported devices using the same Apple Account. In the Music app, tap Library at the bottom to browse Playlists, Albums, Songs, and other categories. Select Downloaded to view music stored locally.

01Open the Apple Music app.
02Tap your profile photo or account icon, then Account Settings to check that you are signed in with the Apple Account used for your Apple Music subscription.
03Open Settings on your iPhone or iPad.
04Tap Apps > Music.
05Turn on Sync Library.
06Open the Music app and tap Library to check your synced songs, albums, playlists, and other content.
07To turn off Sync Library later, go to Settings > Apps > Music and turn off Sync Library. Apple Music songs are removed from that device but remain in your music library on other devices. Purchased or manually synced music remains on the device.
Part 5. How to Sync Your Apple Music Library on Mac
On Mac, open the Music app and select Music > Settings from the macOS menu bar. Click General, then select Sync Library. Your library will sync with other supported devices using the same Apple Account.
Sync Library requires an Apple Music or iTunes Match subscription. If the option is missing, check that the Music app is signed in with the Apple Account linked to your subscription. After enabling Sync Library, give the Music app time to update, then use Library in the sidebar to browse your content.
01Open the Music app on your Mac.
02In the menu bar, click Account and check that you are signed in with the Apple Account used for your Apple Music subscription.
03Click Music > Settings in the menu bar.
04Click General or Preferences.

05Select the Sync Library checkbox, then click OK.

06Wait for the Music app to update your library. If Updating Cloud Library appears at the bottom of the sidebar, click it to check the sync status.
07Click Library in the sidebar to browse your synced music after the update finishes.
08To turn off Sync Library later, go to Music > Settings > General and clear the Sync Library checkbox. Back up your music library before making changes, as Apple Music is not a backup service.
Part 6. How to Sync Your Apple Music Library on Windows PC (Apple Music)
In the current Apple Music app for Windows, open Sidebar Actions, select Settings, and open General. Turn on Sync library to sync your music library with other supported devices using the same Apple Account. If the option is missing, check that the app is signed in with the Apple Account linked to an Apple Music or iTunes Match subscription.
Apple Music will then update your cloud music library. When Updating Cloud Library appears at the bottom of the sidebar, select it to check the sync status. After the update, use the library categories in the sidebar to browse your synced songs, albums, and playlists.
01Open the Apple Music app on your Windows PC.
02Click your name at the bottom of the sidebar and check that you are signed in with the Apple Account used for your Apple Music subscription.
03Click Sidebar Actions at the top of the sidebar.
04Select Settings, then click General.
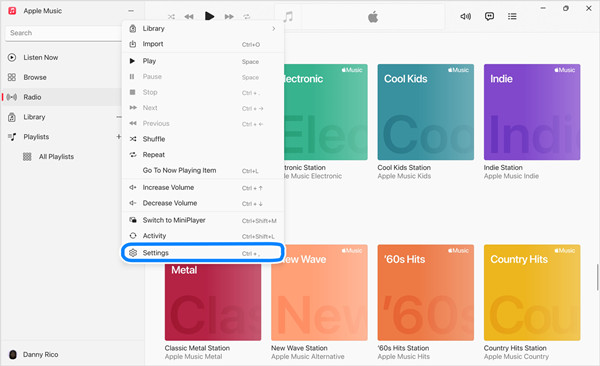
05Turn on Sync library.
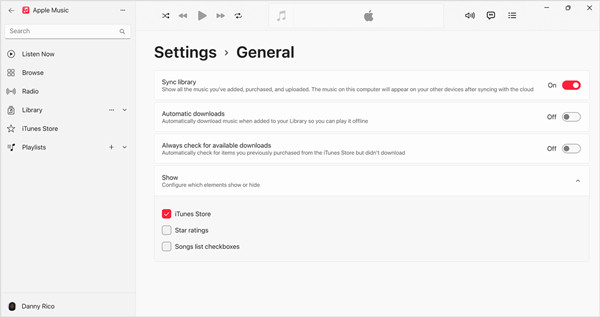
06Wait for Apple Music to update your cloud music library. If Updating Cloud Library appears at the bottom of the sidebar, click it to check the sync status.
07After the update, use the library categories in the sidebar to browse your synced songs, albums, and playlists.
08To turn off Sync Library later, go to Sidebar Actions > Settings > General and turn off Sync library. If you use the older iTunes for Windows, this feature is called iCloud Music Library instead.
Part 7. What Happens When You Turn On or Off Sync Library?
Sync Library can be turned on or off at any time, depending on how you manage your music. The choice depends on how you use your devices, your available storage, and whether you want your library to stay synced automatically.
- You use multiple Apple devices: Keep the same songs and playlists on your iPhone, iPad, Mac, or Windows PC.
- You want Apple Music everywhere: Songs and playlists you add can appear across your devices when Sync Library is enabled.
- You want to mix Apple Music with personal songs: Imported tracks from CDs or other sources can appear alongside Apple Music content in one library.
- You want offline listening across devices: Download music on one device and access it for offline listening on your other devices.
- You want to keep music separate: Keep Apple Music content separate from your personal music library.
- You have limited storage: Avoid downloading more music to your devices than you need.
- You notice duplicate or missing songs: Turning off syncing can help prevent unexpected library changes.
- You prefer manual control: Manage your music manually instead of using automatic library syncing.
Bottom Line: What Happens If You Turn On or Off Sync Library
Turn it on, and your music library stays synced across supported devices. You can access your playlists and other library content across devices when you use the same Apple Account and have an active Apple Music subscription or iTunes Match.
Turn it off, and your library stops syncing through Sync Library. Changes you make on that device will no longer appear on your other devices through Sync Library. On iPhone and iPad, Apple Music songs downloaded to the device are removed, while purchased or manually synced music remains.
For example, if you add playlists on your iPhone and expect them to appear on your Mac, turning off Sync Library will stop those changes from syncing. If you want more control over a device's music library or prefer to manage music manually, turning it off can be useful.
Part 8. How to Transfer Apple Music to Other Devices as Files
Sync Library makes it easy to keep your Apple Music library synced across supported devices, but it does not work with every device. It also depends on an active Apple Music subscription or iTunes Match. If your subscription or service expires, Sync Library stops working, so your library will no longer stay synced across devices and Apple Music content may no longer be available in your synced library.
If you want to transfer Apple Music songs to other devices as regular audio files, Sync Library alone cannot do this. ViWizard Apple Music Converter provides a conversion solution that lets you convert Apple Music songs to common audio formats such as MP3, AAC, M4A, WAV, FLAC, and AIFF. You can then transfer the converted files to other devices, music players, or storage locations for more flexible access. This is useful when you want to keep your music available outside the Apple Music ecosystem or use it on a device that does not support Sync Library.

Key Features of ViWizard Apple Music Converter
Free Trial Free Trial* Security verified. 5, 481,347 people have downloaded it.
- Convert Apple Music songs, playlists, albums, and artists
- Export Apple Music in 6 formats for different devices and players
- Preserve metadata and lyrics when creating music collections
- Organize converted music by artist and album
- Batch download large Apple Music collections
 Step 1: Download and Install ViWizard Apple Music Converter
Start by visiting the ViWizard website and downloading Apple Music Converter for your computer. It works on both Windows and Mac. Once installed, launch the software and sign in with your Apple Music account. This lets you access your Apple Music library, including songs, albums, and playlists, for conversion.
 Step 2: Select MP3 as the Output Format
Next, choose MP3 as the output format for the music you want to transfer between devices. Click the gear icon in the top-right corner to open the settings. Here, you can adjust options such as sample rate, bit rate, and channel settings to control the audio quality and file size. Once you're satisfied with the settings, click OK to confirm.
 Step 3: Choose the Apple Music Songs to Convert
Browse your Apple Music library and select the songs, albums, or playlists you want to transfer as local audio files. Click the "+" button to add your selections to the conversion list, then click "Add to Conversion List" to queue them for conversion. When you're ready, click "Convert" to start. ViWizard will convert the selected Apple Music songs to MP3 files that you can manage locally.
 Step 4: Access and Transfer Your Apple Music Files
Once the conversion is complete, click "History" to view your converted files. Click the folder icon next to a file to open its location on your computer. You can then copy the MP3 files to another device using a USB cable, file transfer method, or other supported option. This lets you manually manage and listen to your Apple Music files on compatible devices without relying on Sync Library.
Option 1: Syncing Apple Music Using iTunes
01Open iTunes on your Windows PC and go to the drop-down menu under the iTunes logo > Check for Updates. Install any available update.
02Connect your iPhone to your PC using a USB cable, unlock it, and tap Trust This Computer if prompted.
03Click the iPhone icon in the top-left corner to open the device summary.
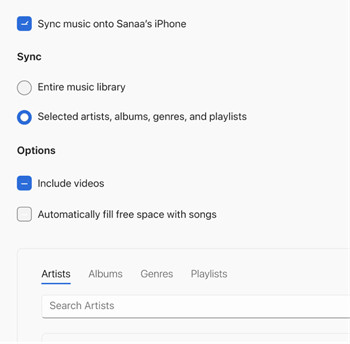
04Select Music in the left sidebar and check Sync Music.
05Choose your entire library or selected playlists, albums, artists, or songs, then optionally check Include videos.

06Click Apply and wait for syncing to finish.
07Disconnect your iPhone. The synced music will appear in the Music app.
Option 2: Syncing Apple Music Using the Apple Devices App
01Open the Microsoft Store, search for Apple Devices, and click Get to install it.
02Connect your iPhone to your PC using a USB cable, unlock it, and tap Trust This Computer if prompted.
03Open Apple Devices and select your iPhone.
04Go to Music and select the playlists, albums, songs, genres, or artists you want to sync.
05Click Sync and wait for the process to finish.
06Disconnect your iPhone. The synced music will be available on the device.
Option 3: Transfer Apple Music Directly
01Connect your Android phone to your computer using a USB cable, unlock it, and select File Transfer or MTP when prompted.
02Open your phone's storage and navigate to the Music folder or another preferred location.
03Open the folder containing your converted Apple Music files on your computer.
04Select the songs or folders you want to transfer and copy or drag them to your Android phone.
05Wait for the transfer to finish, then safely disconnect your phone.
06Open a music player on your Android phone to find and play the transferred songs as local audio files.
Part 9. Conclusion
Sync Library keeps your Apple Music library synced across supported devices, so you can access the same songs, albums, and playlists on your iPhone, iPad, Mac, or Windows PC. However, it depends on compatible devices and an active Apple Music subscription or iTunes Match, so it does not provide a permanent way to keep your music as regular audio files.
If you need to transfer Apple Music songs to unsupported devices, media players, or other storage locations, converting them to common audio formats gives you more flexibility. ViWizard Apple Music Converter can convert Apple Music songs to MP3, AAC, M4A, WAV, FLAC, and AIFF, giving you more control over where and how you access your music.
You May Be Interested





Adam Gorden, the digital media specialist at ViWizard, is dedicated to providing the best solutions for digital media management, including audio and video conversion, file optimization, and media workflow enhancements.

Leave a Comment (0)