Do you notice an artist you do not like still showing up? Many users try to block or remove these artists, expecting them to disappear entirely. In reality, TIDAL's block feature is more limited. It mainly affects your mixes and radios, but the artist can still appear in other areas of the app, such as search results.
It is one thing when the platform still needs that artist to exist across search and other parts of the service. Because of this, blocking alone may not fully solve the problem.
In this post, we will explain how TIDAL's blocking feature works and also show other ways to take control, including using thumbs down feedback, managing your collection, and adjusting your listening habits to better focus on the artists you actually enjoy.
Part 1. Can You Block an Artist on TIDAL?
Yes, users can block an artist on TIDAL, but it is not a full removal feature. According to TIDAL Support, blocking a track, video or artist will just block the content from appearing in mixes and radio content. In other words, blocking is designed to influence recommendations rather than remove an artist from the platform for individual users.
In algorithm-driven areas such as "My Mix," "Track Radio," and "Artist Radio," blocked artists appear less often in personalized recommendations. TIDAL also applies a limit of 1,000 blocks per subscriber.
However, blocked artists can still appear in other parts of the app, including search results. This is because TIDAL uses a shared licensed music catalog for all users. The platform cannot remove or hide content from the catalog for one person. It can only adjust what is recommended, not what exists in the library.
As a result, users still have access to the artist's music, but it is no longer actively promoted through recommendations. Blocking is therefore a preference signal, not a content exclusion tool like an explicit content filter.
Part 2. How to Block an Artist on TIDAL (Step-by-Step Guide)
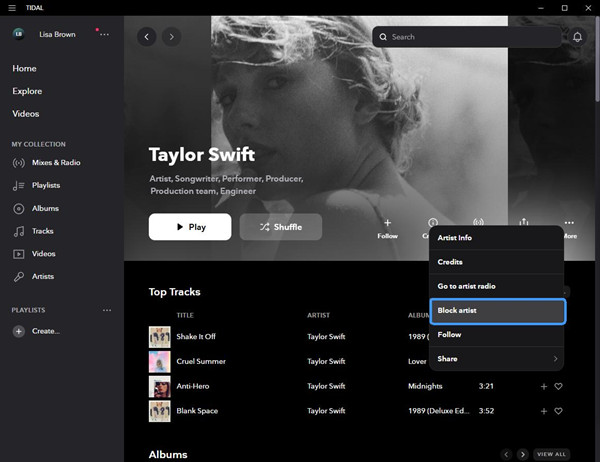
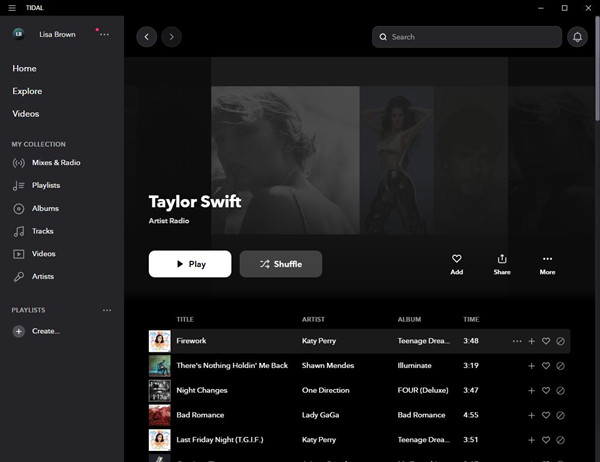
Blocking an artist on TIDAL is simple, but it helps to know what it actually changes. You can go to Artist Radio, Track Radio, or My Mix and select Block Artist. You can also search for the artist, open their profile, tap the three dots icon, and choose Block.
This sends a signal to TIDAL's recommendation system to avoid showing that artist in those algorithm-driven areas. After blocking, TIDAL updates your listening profile in the background and syncs it across devices. The artist appears less often in recommendations, but they are still available on the platform and may show up elsewhere.
On Desktop and Web
01Go to https://tidal.com in your browser or open the TIDAL desktop app.
02Sign in with your TIDAL account if you are not already logged in.
03From the left sidebar or search bar, open a Track Radio, Artist Radio, or My Mix since blocking is available mainly in these recommendation-based sections.
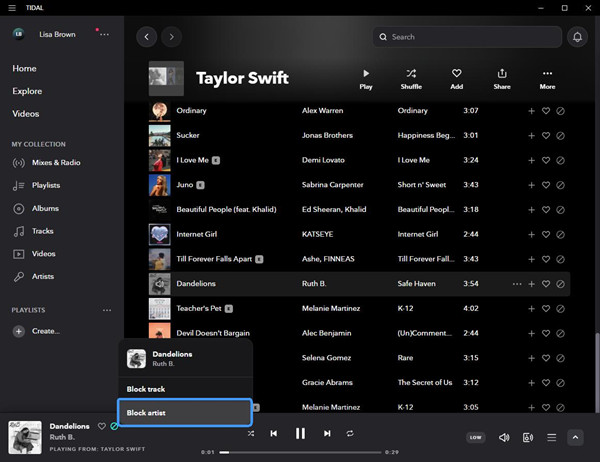
04Start playing a track so the Now Playing bar appears at the bottom of the screen.
05Click the block icon next to the track or artist name in the Now Playing area.
06Select Block Artist from the menu list.
07Confirm the action when asked. The artist will then be removed from your My Mix, radio stations, and personalized recommendations.
On Mobile (iOS & Android)
01Open the TIDAL app on your phone and sign in if needed.
02Use the Search tab or Explore section to find a song by the artist you want to block.
03Start playing the track, or open an Artist Radio or Track Radio.
04Tap the Now Playing screen to open full playback view.
05Tap the three-dot menu (⋯) on the playback screen.
06Select Block Artist from the options shown.
07Tap Confirm. The artist will be blocked and removed from your recommendations, My Mix, and radio playlists.
Part 3. How to Manage or Unblock Artists on TIDAL (Step-by-Step Guide)
Unblocking works in reverse. You can return to the same areas, such as Artist Radio, Track Radio, or My Mix, find the artist again, and select Unblock.

Once removed, TIDAL clears that preference signal from your account. The system then gradually brings the artist back into recommendations and radio content based on your listening behavior. This is not instant, since recommendations update over time. It is closer to resetting a signal than switching something back on immediately.
On Desktop and Web
01Go to https://tidal.com or open the TIDAL desktop app.
02Sign in to your account.
03Click your profile icon in the top-right corner.
04Select Settings from the menu.
05Open My Content, where TIDAL stores personalization settings.
06Click Blocked Content to view your blocked list.
07Go to the Artists tab to see blocked artists.
08Click Unblock next to the artist you want to restore. The artist will then return to your recommendations and radio content as your settings update.
On Mobile (iOS & Android)
01Open the TIDAL app and sign in if needed.
02Tap your Profile icon (location may vary by device).
03Go to Settings.
04Tap Account Settings, then open My Content.
05Select Blocked Content.
06Tap Artists to filter blocked artists only.
07Find the artist you want to unblock.
08Tap Unblock to restore their content in your mixes, radio, and recommendations.
Part 4. Alternative Ways to Block or Hide an Artist on TIDAL
Blocking only affects recommendations, so users often combine it with other actions. TIDAL relies on multiple listening signals, not just one setting.
You can skip songs, use thumbs down feedback, or remove tracks from your collection to signal that you do not want that artist. Over time, these actions help reduce how often unwanted artists appear. It is less about one control and more about consistent listening behavior.
Option 1: Block the artist or song
Open the song or artist page and tap the three-dot menu next to it. If TIDAL shows a "Don't play this" or block-style option, select it. In some cases, this immediately reduces how often the artist appears in your recommendations, but not every version of the app supports full blocking. It is worth trying first because it is the most direct control you have.
Option 2: Skip what you don't like
When a track from an unwanted artist shows up, just skip it right away. You do not need to do anything else. Over time, TIDAL can learn from repeated skips and adjust what it recommends to you. It is not instant, but in daily use it is one of the easiest ways to influence your feed without changing settings.
Option 3: Remove from your collection
Go to your saved songs, albums, or playlists and remove anything from the artist you do not want. Tap the item, open the menu, and choose remove from collection or remove from playlist. This step matters because saved music can still affect what TIDAL recommends, even if you never play it again.
Option 4: Turn off explicit content
Open settings and look for playback or content preferences, then turn off explicit content. This will not block a specific artist, but it removes a large portion of tracks that may come from them. In practice, it helps clean up both search results and recommendations, especially in genres with heavy explicit versions.
Option 5: Use playlists only
Instead of browsing recommendations, stick to playlists you trust. You can use your own playlists or follow curated ones, then play music only from there. This avoids most algorithm-based suggestions, since playlists give you a more controlled listening path compared to the home or discovery feed.
Option 6: Refresh your recommendations
TIDAL recommendations are shaped by what you listen to over time. If you change your listening habits, the system slowly updates what it shows you. Try exploring different genres and avoiding unwanted artists for a while. After some use, your home and discovery sections will start to shift.
Option 7: Play what you want more
Play the artists and songs you actually like more often. Let tracks finish and replay them when possible. This gives stronger signals to TIDAL's recommendation system than skips alone. Over time, it helps push unwanted artists lower in your feed and replaces them with more relevant suggestions. Please note that the block feature is only available and will sometimes only appear when playing mixes and radio content, which means
Part 5. How to Listen Only to Your Favorite Artists on TIDAL
TIDAL is built around discovery, so recommendations always mix with your listening habits. Because of this, focusing only on your favorite artists takes a few combined actions.
For more control, you can also take your music offline.
ViWizard TIDAL Music Converter lets you download and convert tracks, playlists, albums, radios, and artists into formats like MP3 and more. It keeps key details such as artist name, album, and artwork, and supports batch conversion so you can build a clean, organized offline library by artist or album. Once done, you can rely on an offline collection to stick only to your favorite artists and songs anytime.
Download music from Tidal to MP3, FLAC, M4A, M4B, WAV, or AIFF. Works for all users. Listen offline anytime.
You May Be Interested


Matt Smith, a digital entertainment industry enthusiast at ViWizard, is dedicated to providing insightful commentary and solutions for music and media-related topics, including industry trends, analysis, and recommendations.
Leave a Comment (0)