
With a vast library of tracks readily available at our fingertips, YouTube Music listeners can curate personalized playlists and discover new artists effortlessly. However, there's a nostalgic allure to having music on tangible mediums, and many individuals still find joy in creating physical collections of their liked tracks.
In this guide, we'll delve into the process of transforming of your carefully curated YouTube Music playlists into a timeless format: the compact disc (CD). Burning YouTube Music to a CD allows you to bridge the gap between the convenience of digital streaming and the tangible satisfaction of owning a physical collection.
Part 1. Can You Burn a CD from YouTube Music?
Technically, no. YouTube Music does not allow you to burn music directly to a CD. It is a streaming service that uses Digital Rights Management (DRM) to protect its content. Even if you have a Premium subscription and download songs for offline listening, those files are encrypted and stored in a cache format that is not compatible with CD burning.
To burn a CD, you need the music in a standard, unprotected audio format such as MP3, WAV, or FLAC.
The Solution: Use a YouTube to CD Converter
To convert YouTube Music into CD-compatible files, you can use ViWizard YouTube Music Converter. This tool converts tracks into DRM-free audio formats that work with any CD-burning software. After conversion, you can burn the files onto a CD for personal offline listening.
Download YouTube Music and convert tracks to CD-ready formats with original quality and full song info.
Read More: 17 Best Free/Paid YouTube Music Downloaders in 2026
Is It Legal to Burn YouTube Music to a CD?
Yes, burning YouTube Music to CDs is legal when you are burning them for personal use and the original CD is legitimately owned by legally purchased. If you share or sell the CDs to others, it's illegal.
Part 2. How to Convert YouTube Music to CD-Compatible Files
To burn YouTube Music to a CD, first convert the tracks into CD-compatible formats like MP3 or WAV. YouTube Music doesn't offer these formats due to DRM restrictions, so you'll need a conversion tool.
For the best results, check out ViWizard YouTube Music Converter. It allows batch downloading, maintains original audio quality, and keeps ID3 tags like artist name, album, and track information intact. With its one-click batch conversion, you can efficiently prepare your entire music library for CD burning.
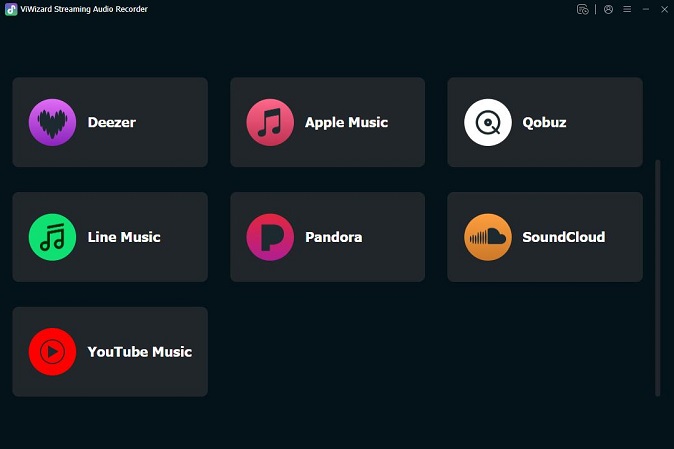
Bonus: With this converter, you can also download music from other major streaming services, including Spotify, Apple Music, SoundCloud, and more.
How to Use ViWizard to Download YouTube Music for CD Burning
Step 1 Set Output Format to CD-Compatible WAV or MP3
Launch ViWizard YouTube Music Converter on your Windows or Mac. Click Menu > Preferences > Conversion. For the best audio quality on a CD, we recommend selecting WAV or MP3. These formats are universally recognized by burning software like Windows Media Player and iTunes. After selecting your format and sample rate, click OK to save your settings.

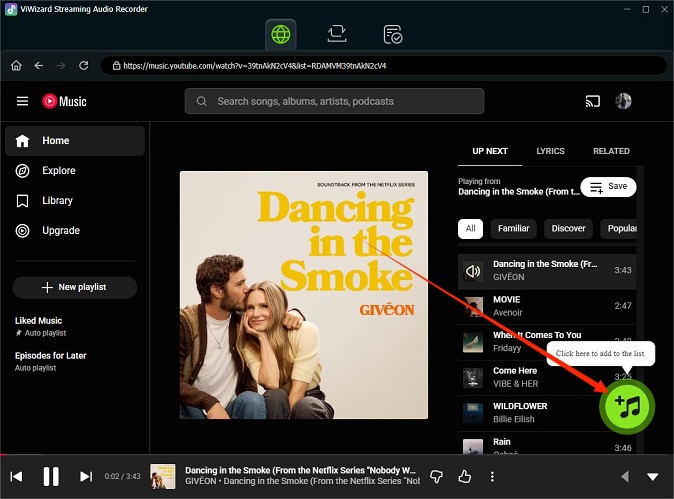
Step 2 Access Your YouTube Music Library
From the main interface, click the YouTube Music icon to open the built-in web player. Log in to your account to access your personal library, including your liked songs and custom playlists. Rest assured, your login information is fully encrypted and protected throughout the process.
Step 3 Add Songs or Playlists for Burning
Browse your library or use the search bar to find the specific songs, albums, or playlists you wish to burn to your CD. Open the desired playlist and click the + (Add) button on the right side. ViWizard will automatically analyze the list; you can then check the specific tracks you want or select the entire list to download in bulk. Click Add to List to confirm.
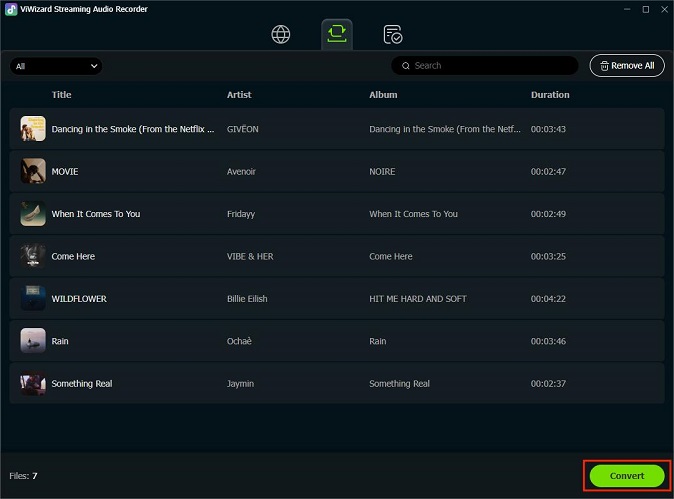
Step 4 Convert YouTube Music to CD-Compatible Files
Review your selection and hit the Convert button. ViWizard will download your YouTube Music tracks at 30x speed, keeping all original ID3 tags intact for proper display on your CD player. After it's done, click the folder icon to locate your DRM-free files, which are now ready for import into your burning software.
Part 3. How to Burn YouTube Music to CD (3 Ways)
After converting your YouTube Music tracks into CD-compatible files, the final step is burning them onto a CD. You can use different software depending on your operating system. Below are three reliable methods to create a music CD.
🤗 Things You Need Before Burning
A blank Disk
Your computer has CD/DVD writer; if not, you can also use an external USB drive
YouTube Music converter, like ViWizard YouTube Music Downloader
Ensure you have already used ViWizard to save your music locally.
Burning software: Media Player for Windows; iTunes for Mac; VLC media player
Way 1. Using Windows Media Player
Windows Media Player not only serves as a media player for Windows users but also offers the functionality to create audio CDs from your captured audio files.
Using Windows Media Player for YouTube Music CD Burning:

- Open Windows Media Player on your computer. You can typically find it by searching for "Windows Media Player" in the Start menu.
- Click on the "Library" tab in Windows Media Player. Navigate to the "Playlist" and the specific playlist containing the captured audio files that you want to burn to the CD.
- Drag and drop these files into the "Burn" panel on the right side of the window.
- Insert a blank, writable CD into your computer's CD/DVD drive.
- Click on the "Burn options menu" at the top of the "Burn" panel and choose the appropriate settings.
- Then, click the "Start burn" button to initiate the CD burning process.
Way 2. Using iTunes
iTunes, Apple's renowned media player and library manager, offers a straightforward method to organize and burn your captured audio files to a CD. iTunes not only allows you to manage your music library but also facilitates the process of creating physical copies of your favorite tracks through CD burning.
Using iTunes for YouTube Music CD Burning:

- Launch iTunes on your computer and import the captured audio files by clicking on "File" > "Add File/Folder to Library." Select the files you wish to burn to a CD.
- In the iTunes sidebar, create a new playlist specifically for the CD you're planning to burn. Name it appropriately to keep your YouTube Music collection organized.
- Drag and drop the captured audio files into the newly created playlist. Arrange them in the order you want to them to appear on the CD.
- Carefully insert a blank writable CD into your computer's CD/DVD drive.
- In the iTunes sidebar, locate the playlist containing the captured audio files that you wish to burn to the CD. Right-click on the playlist name.
- From the context menu that appears, select the option "Burn Playlist to Disc." This will open the Burn Settings dialog box.
- In the Burn Settings dialog box, choose the appropriate settings for your CD, such as the preferred speed and gap between songs. Ensure that the "Audio CD" option is selected.
- Once you've configured the settings, click the "Burn" button to initiate the CD burning process. iTunes will start copying the captured audio files from YouTube Music to the blank CD.
Way 3. Using VLC Media Player
VLC media player is a powerful and free open-source cross-platform (Windows, Mac, Linux, Android, iOS) multimedia player. It supports many file formats for display: DVDs, Audio CDs, VCDs, and various streaming protocols.
Using VLC Media Player for YouTube Music CD Burning:

- Install VLC media player from its official website.
- Open the VLC media player and locate the music file downloaded by ViWizard.
- Directly drag the music files to the Playlists area, or you can right-click to add music to VLC.
- Tap on media option, choose convert/save button.
- Click Disc, hit Audio CDs, and you can tap the convert/save icon again to convert YouTube Music to CDs.
Read More: Full Guide to Record Audio with VLC Media Player
📚 Tips for Burning YouTube Music to CDs
Choose Lower Burning Speed: Too quick a speed may enhance the burning error, so that the CD may cause a playing issue, especially in old drives or media.
Choose the Correct Format: If you want to stream the same audio quality as you stream on YouTube Music, you need to download the music in WAV format.
Choose Name-brand Discs: The high-quality discs have fewer flaws, so that you can have a higher burning successful rate.
Part 4. FAQs About Burning YouTube Music to CD
Will burning music to a CD reduce the sound quality?
Not necessarily. If you use ViWizard YouTube Music Converter to download your music in WAV format and burn it as an Audio CD, the quality will remain lossless.
Can I burn a CD on a laptop that doesn't have a disc drive?
Yes. Since most modern laptops lack internal drives, you can simply connect an external USB CD/DVD drive. They're affordable, easy to use, and work perfectly with software like iTunes or Windows Media Player.
How many songs can I fit on a music CD?
A standard CD-R can hold 74-80 minutes of audio. Depending on the length of your tracks, this usually averages between 15 to 20 MP3 songs.
Why does my CD burn fail or show errors?
Burning failures are typically caused by high burning speeds or poor-quality discs. To fix this, set your burning speed to 2x or 4x in your software settings and use name-brand discs like Verbatim or Sony.
Why won't my burned CD play in my car?
This usually happens if you burn a Data CD instead of an Audio CD. Most car players only recognize the Audio CD format. Additionally, older players may struggle to read high-speed burns or CD-RW discs.
Conclusion
Burning YouTube Music to a CD may involve a few extra steps due to DRM protection, but with the right approach and tools like ViWizard YouTube Music Converter, you can create a personalized collection without infringing upon copyright. Using the methods combining ViWizard YouTube Music Converter nad other popular software to burn Youtube Music to a CD is the best way to enjoy your favorite tunes hassle-free.
You May Be Interested


Matt Smith, a digital entertainment industry enthusiast at ViWizard, is dedicated to providing insightful commentary and solutions for music and media-related topics, including industry trends, analysis, and recommendations.
Leave a Comment (0)