Is it easy to record audio from YouTube with Audacity? Yes and no. It's not as simple as just clicking the Record button. Audacity can record YouTube audio, but how it works depends a lot on your system setup. Windows and macOS handle sound very differently.
In this guide, you'll learn the up-to-date, tested ways to record YouTube audio with Audacity on both Windows and Mac. We'll also walk you through how to edit, trim, and export your recordings in common formats like MP3 and WAV, so your audio is ready to use anywhere.
Before we dive in, one quick note: this article focuses on recording for personal use, such as offline listening or learning projects. Please respect YouTube's terms of service and copyright rules when saving audio.
Part 1. Can Audacity Record Music from YouTube?
Yes, Audacity can record audio from YouTube. It records whatever sound your computer is playing. So when a YouTube video is playing, Audacity can capture that audio in real time. Just like recording from a microphone, but using your system sound as the source.
What Audacity Gets You When Recording:
- Zero-Loss Digital Capture: By using specific internal protocols like WASAPI on Windows, Audacity records the audio data before it is converted into an analog signal for your speakers. This means you get the cleanest possible copy of the stream.
- Real-time Monitoring: You can see the audio waveform as it records. If the sound is too loud or too quiet, you will know instantly and can adjust it.
- Post-Capture Control: Once the music is recorded, you are already working inside a professional editor. You can remove unwanted intros, apply fades, or boost the bass without switching apps.
What Content Audacity Can Record from YouTube:
- Music from YouTube and YouTube Music
- Audio from music videos
- Podcasts, live sessions, and interviews
- Any sound playing through your computer
Is It Reliable to Record YouTube Music Using Audacity?
Yes, it is reliable. When set up correctly, Audacity captures the full audio stream from YouTube without adding extra quality loss. That said, it may not always be the best choice for every situation.
Why? YouTube typically streams audio at a maximum of about 165 kbps in Opus format. While Audacity lets you export files in studio-quality formats like 24-bit and 96 kHz, it is important to set realistic expectations. Recording cannot turn a compressed stream into true high-fidelity audio. What Audacity does guarantee is that you do not lose any additional quality during the recording process.
Part 2. How to Record Music from YouTube Using Audacity
Audacity's user interface is not very intuitive. It has many toolbars. If you are new to it, it is best to follow the detailed guide for Windows and Mac. We have tested the steps and successfully recorded audio from YouTube and YouTube Music.
To be clear, if you want to record audio directly from YouTube, read section 2.1 for Windows or section 2.2 for Mac. If you want to extract audio from an already downloaded YouTube video, section 2.3 is for you.
2.1 Record YouTube Audio with Audacity on Windows
System Requirements & Tools:
- OS: Windows 10, 11, or later
- Audacity: Version 3.4 or newer (Official Download)
- Equipment: A speaker or headphones to output the audio from your computer
Steps to Use Audacity for YouTube Music on Windows:
In this guide, we demonstrate the steps on Windows 10 using a track from YouTube Music web player. These steps have been tested and also work for audio from regular YouTube videos.
Step 1 Download Audacity to your Windows computer and open it.
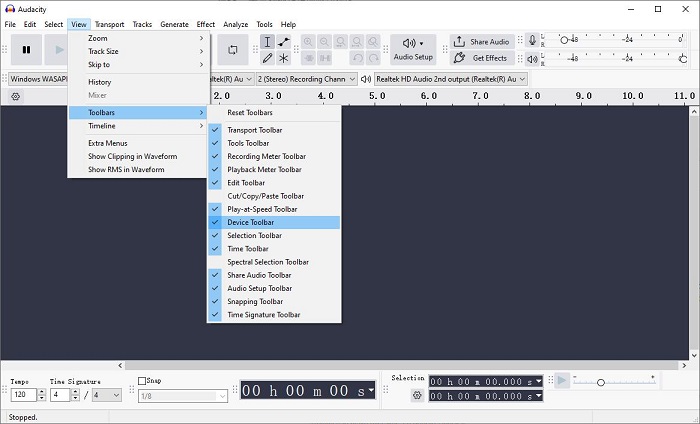
Step 2 At the top toolbar, click View > Toolbars > enable Device Toolbar.
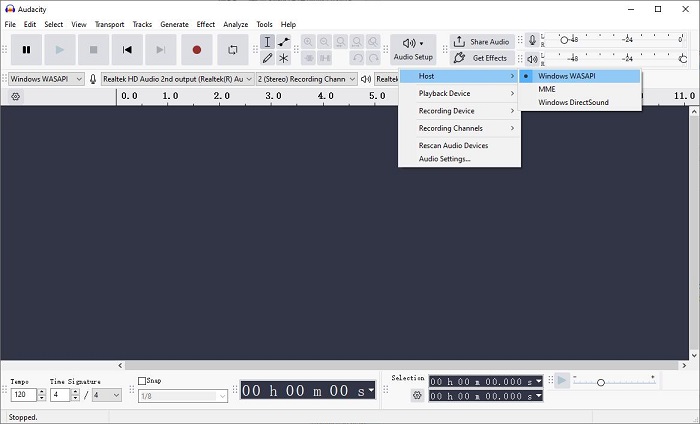
Step 3 Click the Audio Setup button in the top toolbar.
Step 4 Click Host and select Windows WASAPI. If the options are greyed out, click Rescan Audio Devices in the Audio Setup dropdown menu.
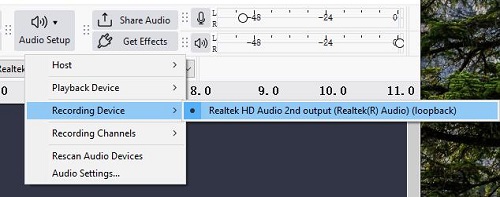
Step 5 Click Recording Device and select your primary output device followed by the word loopback.
Step 6 Click Audio Setup again. In Recording Channels, choose 2 (Stereo) Recording Channels.

Step 7 Click the red Record button in Audacity.
Step 8 Start playing the song in YouTube Music or the YouTube video in your browser. You will see the audio waves appearing in Audacity.
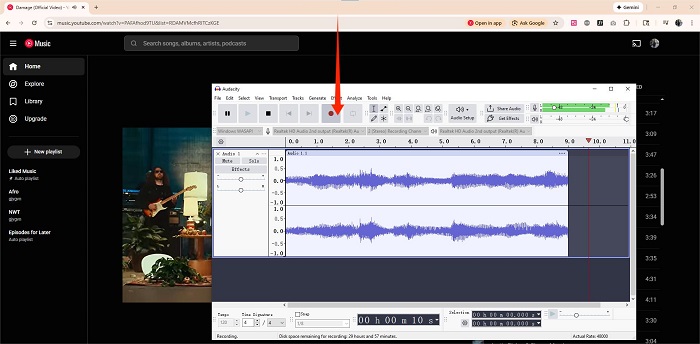
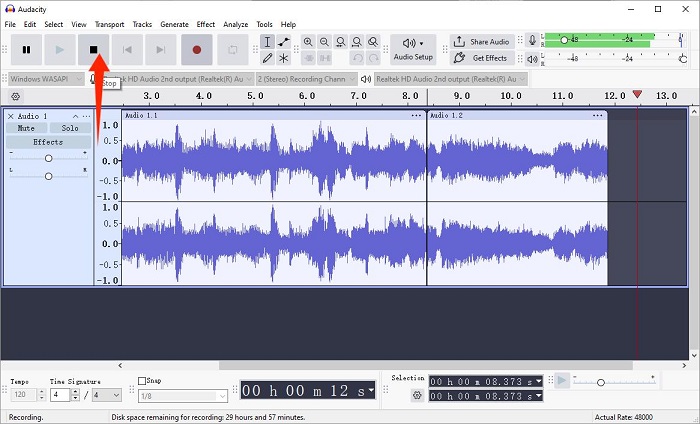
Step 9 When finished, click the square Stop button in Audacity.
2.2 Record YouTube Audio with Audacity on Mac
macOS blocks internal audio recording by default for security. To get around this, we use a virtual bridge called BlackHole. It is the modern, faster, and more secure successor to the old Soundflower driver.
System Requirements & Tools:
- OS: macOS 12 (Monterey) to macOS 16 (Tahoe) or later
- Audacity: Latest version (Official Download)
- Virtual Driver: BlackHole 2ch (Free Download)
- Equipment: A speaker or headphones to output the audio from your computer
Before You Start: Set Up Audio Routing on Mac
Step 1 Download and install the latest Audacity and BlackHole on your Mac.
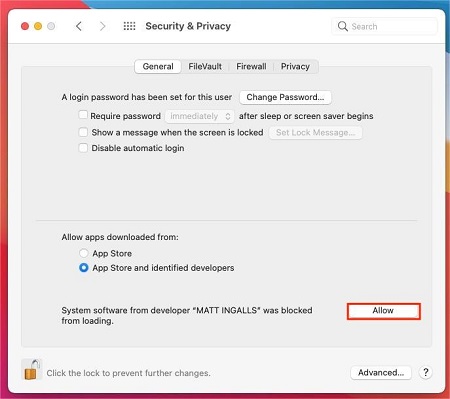
Step 2 If your Mac shows "unidentified developer," go to Apple menu > System Preferences > Security & Privacy > General and click Allow.
Step 3 Open Finder > Applications > Utilities > Audio MIDI Setup.

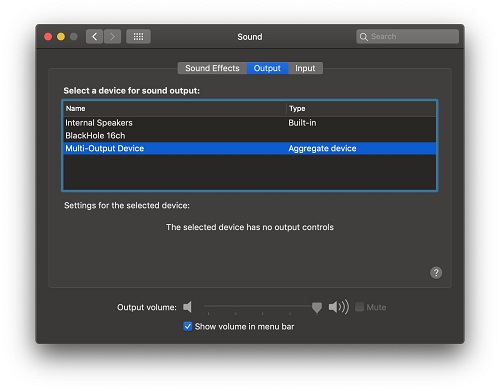
Step 4 Click the plus button and choose Create Multi Output Device.
Step 5 Check these two devices: BlackHole 2ch and Built-in Output. This allows you to hear the music while you record it.
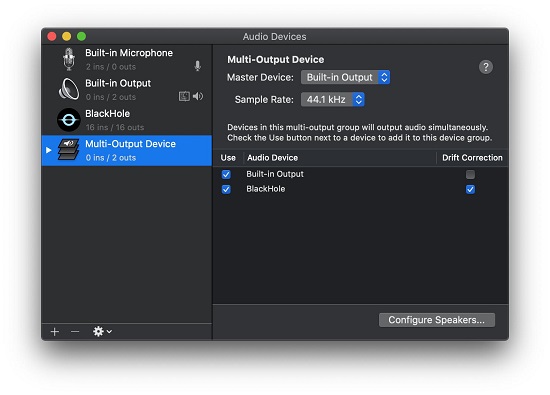
Step 6 Open System Settings > Sound > Output.
Step 7 Select the new Multi Output Device as your system output.
Steps to Use Audacity for YouTube Music on Mac:
In this guide, we follow the steps on macOS Sequoia 15 using a track from YouTube Music web player. The method has also been verified to work with standard YouTube videos.
Step 1 Open Audacity.
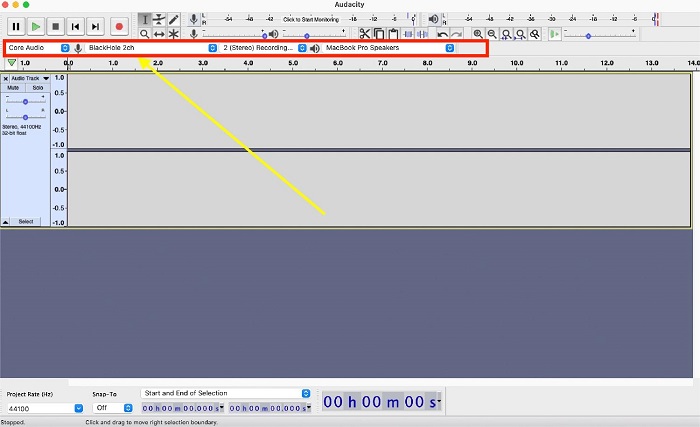
Step 2 Set the Core Audio as the audio host.
Step 3 Set the BlackHole 2ch as the audio input and output and set the Channels to 2 (Stereo).
Step 4 Open the YouTube video or YouTube Music in your browser and pause it.
Step 5 Click the Record button in Audacity.
Step 6 Start playing audio from YouTube Music or YouTube.
Step 7 When finished, click Stop.
2.3 Get Audio from YouTube Videos in Audacity
Sometimes you already have a downloaded YouTube video in MP4 or M4V format and want to extract the audio directly in Audacity. By default, Audacity cannot read video files to pull the audio out. To unlock this feature, you need to install the FFmpeg Library. This library allows Audacity to import audio from the video.
Video Formats Supported in Audacity (with FFmpeg):
Audacity cannot open video files directly by itself. With the FFmpeg library installed, it can extract audio from most common video formats:
- MP4
- MOV
- AVI
- WMV
- M4V
- FLV
- MKV
System Requirements & Tools:
- Audacity Version: 3.4 or newer
- Windows Download: FFmpeg v5.0.0 Installer (64-bit)
- Mac Download: FFmpeg v5.0.0 PKG for macOS
- Compatibility: Supports Apple Silicon (M1/M2/M3) and modern Windows 10/11 systems
Steps to Get Audio from YouTube Videos in Audacity:
Step 1 Download and install Audacity and FFmpeg on your computer. If Audacity was open during the FFmpeg installation, restart Audacity.
Step 2 Launch Audacity.
Step 3 Click File > Import > Audio.
Step 4 Select the YouTube video stored on your computer. Audacity will automatically extract the audio track.
Step 5 You will see the waveform appear in Audacity.
Step 6 Go to File > Export Audio.
Step 7 Choose the audio format, output location, file name, and quality settings.
Step 8 Click Export. You now have the audio extracted from your YouTube video.

Part 3. How to Edit and Export YouTube Audio in Audacity
Once you have recorded audio from YouTube or YouTube Music, Audacity lets you quickly clean it up and export it in the format you need.
How to Edit YouTube Audio in Audacity:
Sometimes, you might record the intro sounds, sponsorship callouts, or silence sounds. You can use Audacity editing tools to cut out the audio you don't want. Plus, you can also use other tools to make the audio cleaner.
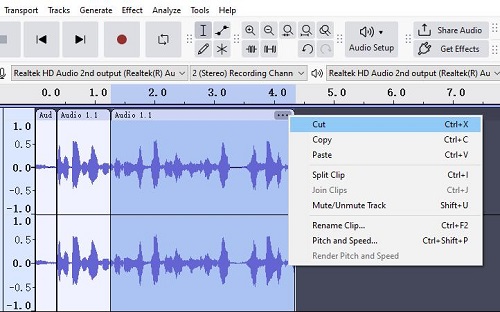
- Trim Unwanted Sections: Use the Selection Tool (the I-beam icon) to locate the end and the beginning of the segment you want to delete. right click on the area and choose split clip. Then, click the three dot on the right top of the audio segment. Choose cut.
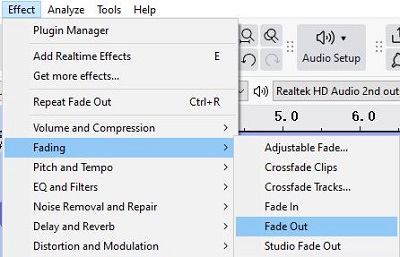
- Precision Fading: YouTube videos can end abruptly. Highlight the last 3–5 seconds of your track and go to Effect > Fading > Fade Out. This creates a smooth transition instead of a jarring cut.
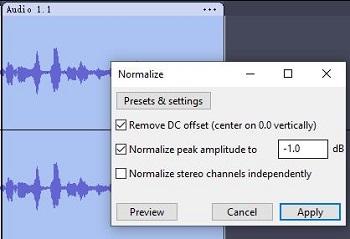
- Volume Normalization: YouTube's "Loudness Normalization" can make some songs sound quieter than others in your local library. Go to Effect > Volume and Compression > Normalize and set the peak to -1.0 dB. This brings the track to a standard, high-volume level without causing digital distortion.
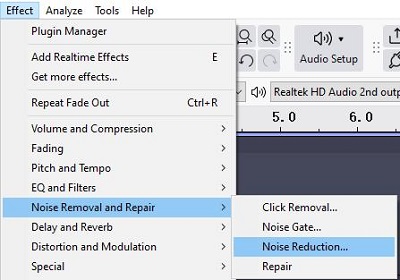
- Remove Noise: Use Effect > Noise Reduction if background hiss or static is present from a live YouTube recording.
How to Export YouTube Audio in Audacity:
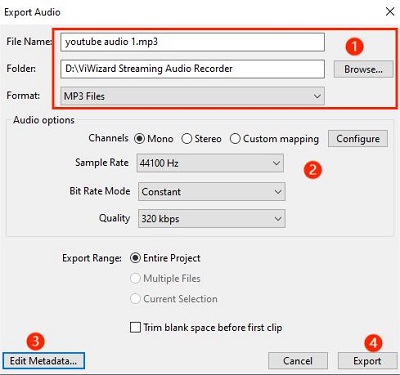
Step 1 Go to File > Export Audio.

Step 2 Choose Export to Computer.
Step 3 In the pop-up window, name the file, choose the output folder, and select a format from MP3, FLAC, WAV, and more in the drop-down menu.
Step 4 If you choose MP3, make sure Bitrate Mode is set to Constant and Quality is 320 kbps. While YouTube's source is lower than this, exporting at 320 kbps helps prevent transcoding loss.
Step 5 If you want to keep the audio exactly as recorded without any extra compression, choose WAV or FLAC.
Step 6 Click Edit Metadata in the bottom-left corner of the window. Since YouTube files do not include ID3 data, enter the artist name and track title manually.
Step 7 Click Export to save the audio from YouTube to your computer.
Part 4. A More Efficient Alternative to Audacity for YouTube Music
If real time recording feels too slow and you do not want to trim audio by hand, ViWizard Streaming Audio Recorder is a more efficient professional alternative.
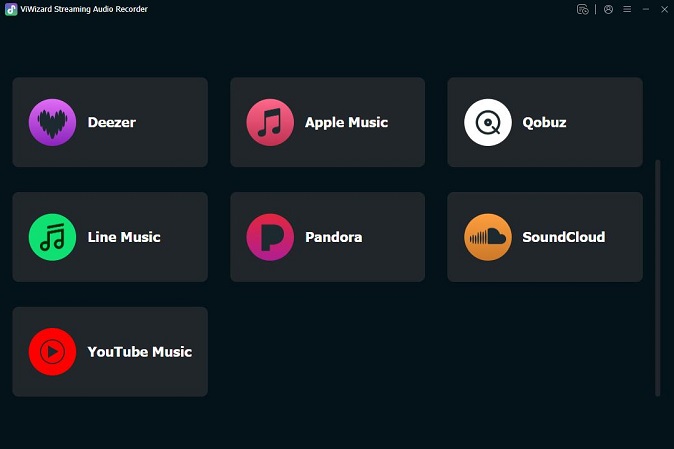
ViWizard Streaming Audio Recorder saves audio from YouTube Music and nine other popular platforms for personal offline listening. It downloads songs and playlists directly and converts them to MP3, FLAC, M4A, M4B, AIFF, or WAV. With batch download mode, you can save hundreds of tracks in one click. In our testing, it works up to 30 times faster than downloading songs one by one on the YouTube platform.
| Feature | Audacity | ViWizard Streaming Audio Recorder |
|---|---|---|
| How it gets audio | Records system sound in real time | Downloads directly from YouTube Music |
| Setup required | Needs audio routing and system settings | Works after quick install |
| Recording speed | Real time only | Supports batch download |
| Audio consistency | Can vary based on system and volume | Stable and consistent |
| Background noise risk | Possible | None |
| Best for | Editing, podcasts, sound projects | Saving YouTube Music for offline use |
A versatile all-in-one streaming music recorder that downloads music from YouTube Music, Spotify, Apple Music, Amazon Music, Tidal, Deezer, Pandora, SoundCloud, Qobuz and LINE MUSIC into MP3, FLAC, WAV, AIFF, M4A, and M4B formats in high quality.
How to Get Audio from YouTube Music Using ViWizard Software
Step 1 Open ViWizard Streaming Audio Recorder on your computer. Click Menu, then Preferences, and go to the Conversion tab. Choose the audio format you want, such as MP3, FLAC, or M4A. Adjust the audio quality if needed and select a folder to save your files. Click OK to apply the settings.

Step 2 Return to the main screen. Click the YouTube Music icon to launch the built in web player. Sign in to your YouTube Music account.
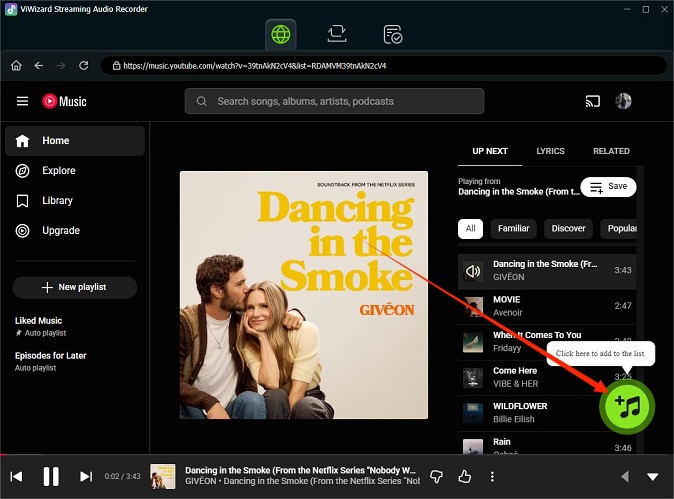
Step 3 Use the player just like the regular YouTube Music website. Search for songs, albums, playlists, or podcasts. Open the content you want to save. Click the green Plus button in the bottom right corner.
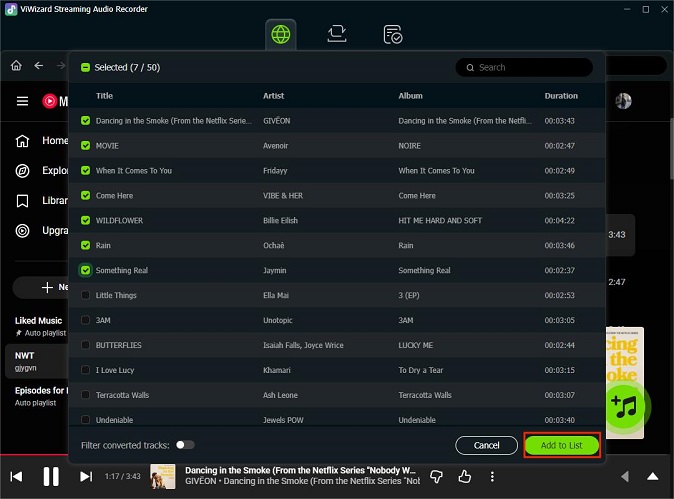
Step 4 A window will show all available tracks on the page. Choose Select All to grab everything, or pick only the songs you need. Click Add to List to confirm your selection.
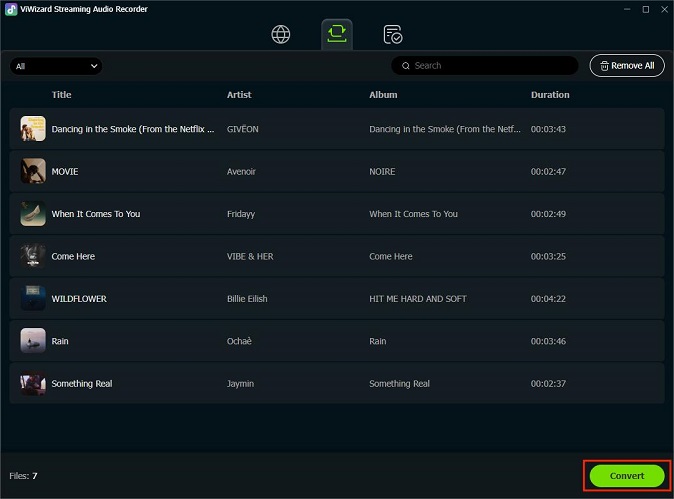
Step 5 Click the Convert button to start downloading. ViWizard will save your music with artist names, album info, and cover art. When the process is finished, you can play the tracks inside the app. You can also open the output folder and listen with any media player, even without an internet connection.
For more alternatives to Audacity on Windows and Mac, check out this complete guide to the best streaming audio recorders.
Read More : 9 Best Streaming Audio Recorders Review in 2026
Part 5. FAQs About Audacity and YouTube Audio
Can Audacity record YouTube audio without downloading the video?
Yes, Audacity can record YouTube audio in real time without downloading the video. You just need to play the video or music in your browser while recording. On Windows, set the audio host to Windows WASAPI and select your output device with (loopback) in the name. On Mac, you need BlackHole to route the browser audio into Audacity so it can be captured.
Why is my Audacity not recording any music from YouTube?
Common causes include:
- Incorrect audio host: Set it to Windows WASAPI on Windows or Core Audio on Mac.
- Wrong recording device: Select the (loopback) version of your output device to capture system sound.
- Missing system permission: According to Audacity Support, modern versions of Windows and macOS treat internal audio like a microphone. You must allow Audacity to access the microphone in your system's privacy settings.
Is it legal to record songs from YouTube Music?
Recording from YouTube violates YouTube's Terms of Service. They do not allow content extraction. From a legal standpoint, creating a copy for personal, offline, and non-commercial use is generally considered a gray area in many regions. You should never share, sell, or upload the recordings, and keep them for your own listening only.
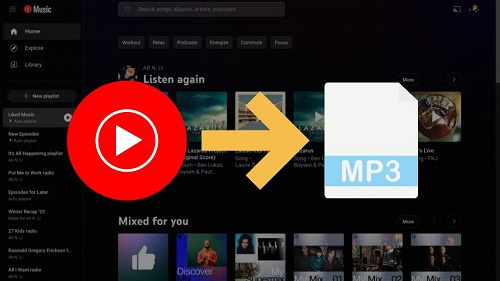
Can Audacity record YouTube audio in MP3 format directly?
No, Audacity records in a high-quality, uncompressed internal format. After recording, you need to export the audio to MP3 by going to File > Export Audio> set the format to MP3. This gives you a playable MP3 file from your recording.
Why can I not hear the music while recording on Mac?
If your system output is set to BlackHole, the audio is sent to the virtual device instead of your speakers. Audacity can record it, but you will not hear it. To fix this:
- Open Audio MIDI Setup on your Mac.
- Create a Multi Output Device.
- Check both Built-in Output and BlackHole 2ch.
- Set your system output to this new Multi Output Device.
Conclusion
Recording YouTube audio with Audacity on Windows and Mac works well for experienced users, but it can be confusing for beginners. Installing drivers on Mac, managing format limits, and trimming recordings by hand can take extra time.
For a faster and simpler option, ViWizard Streaming Audio Recorder is a better choice. It downloads tracks in high quality, supports multiple formats, and can handle entire playlists at once. Although it is a paid tool, it saves time and removes technical hurdles.
You May Be Interested


Nick Orin, a software developer at ViWizard, focuses on providing solutions for software-related challenges, including reviews, troubleshooting, and optimization tips.
Leave a Comment (0)